インストール過程を示します。ここでは新規インストールから
アクセスポイントとDHCPをインストールして、
PCやスマフォからWifiで接続してSSHで通信できるように設定するまでを紹介しています。
このインストールは、OSのバージョンなどによって同じようにはできない可能性があります。
(過去にそういうことがありました)
そこで、インストールのOSバージョンも示します。
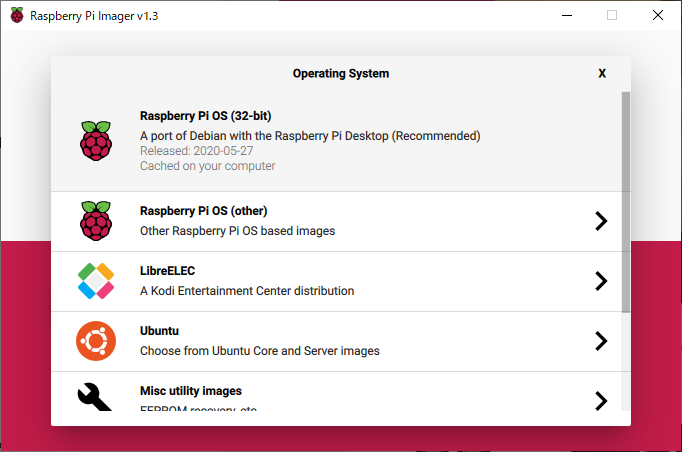
「https://www.raspberrypi.org/downloads/」からwindows用の「Raspberry Pi OS (previously called Raspbian)」
を選び、「imager.exe」を取得しました。
32MのSDとSD Writerを用意して「imager.exe」を実行してインストールします。
(OSとドライブをボタンで選択し、WRITEボタンでSDカードに書き込みます。)
以下のバージョンでした。
  Version:May 2020
  Release date:2020-05-27
  Kernel version:4.19
(2021-05の時点で、旧バージョンのOSイメージ(2020-02-13-raspbian-buster.zip)は、
「http://ftp.jaist.ac.jp/pub/raspberrypi/raspbian/images/」より入手できました。)
SDカードをRaspberry Piにセットして起動します。
Nextで初期設定画面を進みます。
- 最初は[Set Country]
Japan
Japanese
Tokyo
□Use English languageにチェック □ Use US keyboard は、チェックしない。 しばらく、待たされて[Change Password]画面 - Nextボタンで進むと、[Set Up Screen]画面になります。 ここで、画面の端に黒い枠がある場合は、 [□ This screen shows a border around the deskop] をチェックするようですが、私の場合は枠がなかったので、チェックせずに Nextボタンで進めた。
- [Select Wireless Network]画面になります。 アクセスポイントを選択しNextボタンをクリックします。 Password をキー入力して進めます。 Select Wireless Network はSkip [Update Software]画面になり、しばらくアップデート処理が続きます。 (私の環境では15分程度?かかった。)
- [Setup Complete]画面になります。 [Restart]ボタンで再起動で、最初のセットアップは終了
有線のイーサーネット接続で、
再起動後、config でIPアドレス(192.168.0.29だった)を確認して、
pingで疎通を確認できればOK!です。
続けてデスクトップのメニューから、コンソールを出して次のコマンドを入力して初期設定します。
pi@raspberrypi:~ $ sudo raspi-config
ここで、次の各項目を設定します。
localisation options Change Local JP UTF-8
localisation options Change WLAN Country JP Japan
Interfacing Option SSH enable にする。
以上で「ttermpro.exe pi@raspberrypi.local』のSSHでコマンド制御が可能になります。
PC側で「Tera Term」というターミナルエミュレータを別途にインストールします。
(「Tera Term」の入手は使い方の情報はネットなどから探して得てください。)
前述で確認した有線のイーサーネットで接続で行います。
「Tera Term」で SSH により接続できることを確認します。
このままコマンドラインでパスワード設定、アップデート、vimなどのインストールを行います。
(ここで、別途 su のパスワードも設定する。この作業例を以下に示します。)
pi@raspberrypi:~ $ sudo passwd root
New password:
Retype new password:
passwd: password updated successfully
pi@raspberrypi:~ $
pi@raspberrypi:~ $ uname -a
Linux raspberrypi 4.19.118-v7+ #1311 SMP Mon Apr 27 14:21:24 BST 2020 armv7l GNU/Linux
pi@raspberrypi:~ $
pi@raspberrypi:~ $ sudo apt-get install vim
  ・・表記省略・・
pi@raspberrypi:~ $ sudo apt-get update
  ・・表記省略・・
pi@raspberrypi:~ $ sudo apt-get upgrade
初期起動後の初期設定
以降は、「Tera Term」で SSH による遠隔操作で行います。
「sudo apt-get install dnsmasq hostapd」で、 dnsmasq と hostapdインストールします。
dnsmasq は、小規模ネットワーク向けのDNS/DHCP/TFTPサーバーで、
hostapdは、WiFiアクセスポイント化モジュールでし。
その例を以下に示します。
pi@raspberrypi:~ $ sudo apt-get install dnsmasq hostapd
Reading package lists... Done
Building dependency tree
Reading state information... Done
The following package was automatically installed and is no longer required:
  rpi-eeprom-images
Use 'sudo apt autoremove' to remove it.
The following additional packages will be installed:
  dns-root-data dnsmasq-base
The following NEW packages will be installed:
  dns-root-data dnsmasq dnsmasq-base hostapd
0 upgraded, 4 newly installed, 0 to remove and 0 not upgraded.
Need to get 1,050 kB of archives.
After this operation, 2,666 kB of additional disk space will be used.
Do you want to continue? [Y/n] y
Get:1 http://archive.raspberrypi.org/debian buster/main armhf dnsmasq-base armhf 2.80-1+rpt1 [400 kB]
Get:2 http://ftp.jaist.ac.jp/pub/Linux/raspbian-archive/raspbian buster/main armhf hostapd armhf 2:2.7+git20190128+0c1e29f-6+deb10u2 [629 kB]
Get:3 http://ftp.jaist.ac.jp/pub/Linux/raspbian-archive/raspbian buster/main armhf dns-root-data all 2019031302 [5,396 B]
Get:4 http://archive.raspberrypi.org/debian buster/main armhf dnsmasq all 2.80-1+rpt1 [16.5 kB]
Fetched 1,050 kB in 2s (442 kB/s)
Selecting previously unselected package hostapd.
(Reading database ... 95554 files and directories currently installed.)
Preparing to unpack .../hostapd_2%3a2.7+git20190128+0c1e29f-6+deb10u2_armhf.deb ...
Unpacking hostapd (2:2.7+git20190128+0c1e29f-6+deb10u2) ...
Selecting previously unselected package dns-root-data.
Preparing to unpack .../dns-root-data_2019031302_all.deb ...
Unpacking dns-root-data (2019031302) ...
Selecting previously unselected package dnsmasq-base.
Preparing to unpack .../dnsmasq-base_2.80-1+rpt1_armhf.deb ...
Unpacking dnsmasq-base (2.80-1+rpt1) ...
Selecting previously unselected package dnsmasq.
Preparing to unpack .../dnsmasq_2.80-1+rpt1_all.deb ...
Unpacking dnsmasq (2.80-1+rpt1) ...
Setting up dnsmasq-base (2.80-1+rpt1) ...
Setting up dns-root-data (2019031302) ...
Setting up dnsmasq (2.80-1+rpt1) ...
Created symlink /etc/systemd/system/multi-user.target.wants/dnsmasq.service → /lib/systemd/system/dnsmasq.service.
Setting up hostapd (2:2.7+git20190128+0c1e29f-6+deb10u2) ...
Created symlink /etc/systemd/system/multi-user.target.wants/hostapd.service → /lib/systemd/system/hostapd.service.
Job for hostapd.service failed because the control process exited with error code.
See "systemctl status hostapd.service" and "journalctl -xe" for details.
Created symlink /etc/systemd/system/hostapd.service → /dev/null.
Processing triggers for systemd (241-7~deb10u4+rpi1) ...
Processing triggers for man-db (2.8.5-2) ...
Processing triggers for dbus (1.12.16-1) ...
pi@raspberrypi:~ $
これらを次の操作で一旦停止します。$ sudo systemctl stop dnsmasq $ sudo systemctl stop hostapd
「sudo nano /etc/dhcpcd.conf」で、WifiのIPアドレスを固定化します
「/etc/dhcpcd.conf」の最後に以下を追加します。
denyinterfaces wlan0

interface wlan0
static ip_address=192.168.100.1/24
(上記[denyinterfaces wlan0]がないとアクセスポイントが見えなくなり、
そしてifconfig でip_addressが有効になるようです。
逆にあると、ip_addressが設定がなくなり、アクセスポイントが見えるようになる挙動でした。
最終的に上記の設定で動作していますが、この設定は試行錯誤の結果です。)
次に、dnsmasqの設定です(DNSサーバ機能は使っておらず、DHCP機能だけ使っています
「sudo mv /etc/dnsmasq.conf /etc/dnsmasq.conf.old」の操作で移動し、バックアップします。
「sudo nano /etc/dnsmasq.conf」でファイルを次の内容にします。
DHCPとして配信するIPアドレスの範囲を指定しています。
interface=wlan0
dhcp-range=192.168.100.2,192.168.100.40,255.255.255.0,24h
次に、hostapdの設定です(アクセス・ポイントとしての設定)
「sudo nano /etc/hostapd/hostapd.conf」でファイルを次の内容にします。
interface=wlan0
driver=nl80211
ssid=Pi3-AP
hw_mode=g
channel=6
wmm_enabled=0
macaddr_acl=0
auth_algs=1
wpa=2
wpa_key_mgmt=WPA-PSK
rsn_pairwise=CCMP
wpa_passphrase=abc123xyz
上記のSSIDやwpa_passphraseなどは適当に変更するとよいでしょう。
次に、「$ sudo nano /etc/default/hostapd」で、
「#DAEMON_CONF=""」のコメント行を
「DAEMON_CONF="/etc/hostapd/hostapd.conf"」に変更します。
次に、以下の操作でサービスを有効にしてリブートします。
$ sudo systemctl unmask hostapd
$ sudo systemctl enable hostapd
$ sudo systemctl enable dnsmasq
$ sudo reboot
/etc/rc.localで強制的 IPアドレスを指定する
前述の再起動で、アクセスポイントての接続はできたのですが、DHCPによるIPアドレスの取得はできませんでした。
)
systemctl status dnsmasqによる確認で、以前バージョン(Raspbian GNU/Linux 9.4)と同じように
「raspberrypi dnsmasq-dhcp[482]: DHCP packet received on wlan0 which has no address」
のようなメッセージが複数出現し、wlan0のアドレスが失われてDHCPが動作できない状態です。
もし、正しく動作できていれば終わりなのですが、上記の不具合メッセージが出る場合は、以下の方法で対応でます。
これは、暫定的対処で、他によい方法があるかもしれません。
「sudo nano /etc/rc.local」 で編集し、 exit 0 の直前に以下を追記します。
service dnsmasq stop
ip a add 192.168.100.1/255.255.255.0 dev wlan0:0
sleep 8
service dnsmasq start
再起動して確かめる
当方では以上で動作しました。上記の設定であれば
PCやスマフォでアクセスポイントを探すと「Pi3-AP」のSSIDが見えるはずです。
wpa_passphraseで、「abc123xyz」を入力すれば、DHCPで「192.168.100.2~192.168.100.40」の範囲で、
どれかのIPアドレスが設定されるでしょう。
後は有線と同じように、SSHで(PCであれば「Tera Term」などで)、「192.168.100.1」に接続して
[Raspberry PI]にログオンして遠隔操作ができるでしょう。
後は、ここで示すように[Raspberry PI]にUSB接続した、[UMEHOSHI ITA]を遠隔操作できるようになります。