レイアウト紹介

JFrame内で使われるJPanelは、 Containerのサブクラスです。 ContainerJPanelの関係は次のようになっています。
java.lang.Object
  └java.awt.Container
    └java.awt.Container
      └javax.swing.JComponent
        └ javax.swing.JPanel
このContainerは、部品を配置するスーパークラスで、addメソッドなどの配置命令や その配置方法を指定するsetLayoutメソッドなどが用意されています。
このsetLayoutメソッドの引数で、 LayoutManagerインタフェースの実装クラスを 指定することで、レイアウト(配置)方法が変更できます。 詳細は次のリンクで調べましょう。
以下で代表的なレイアウトの指定例を紹介します。

パネル単体のレイアウトです。

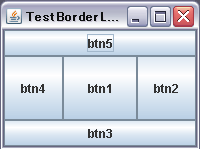
BorderLayout
package test;
import java.awt.BorderLayout;//配置のクラスの一つ
import javax.swing.JPanel;
import javax.swing.JFrame;
import javax.swing.JButton;

public class BorderLayoutPanel extends JPanel{
	JButton []btn = new JButton[5];//ボタン配列
	public BorderLayoutPanel(){
		this.setLayout(new BorderLayout());//BorderLayoutの配置に設定
		this.add(btn[0] = new JButton("btn1"), BorderLayout.CENTER);
		this.add(btn[1] = new JButton("btn2"), BorderLayout.EAST);
		this.add(btn[2] = new JButton("btn3"), BorderLayout.SOUTH);
		this.add(btn[3] = new JButton("btn4"), BorderLayout.WEST);
		this.add(btn[4] = new JButton("btn5"), BorderLayout.NORTH);
	}

	public static void main(String[] args){
		new TestBorderLayout();
		JFrame frm2 = new TestBorderLayout();
		frm2.setBounds(100, 150, 300, 250);
	}
}

class TestBorderLayout extends JFrame
{
	public TestBorderLayout(){
		this.setDefaultCloseOperation(JFrame.DISPOSE_ON_CLOSE);
		this.setTitle("TestBorderLayout");
		JPanel panel = new BorderLayoutPanel();
		this.setContentPane(panel);
		this.setBounds(0, 0, 200, 150);
		this.setVisible(true);
	}
}

これまで使ってきた
 レイアウトです。
(これは、
JFrameのデフォルトの
レイアウトです) 


FlowLayout
package test;
import java.awt.FlowLayout;//配置のクラスの一つ
import javax.swing.JPanel;
import javax.swing.JFrame;
import javax.swing.JButton;

public class FlowLayoutPanel extends JPanel
{
	JButton[] btn = new JButton[5];//ボタン配列
	public FlowLayoutPanel(){
		this.setLayout(new FlowLayout());
		//↑FlowLayoutの配置に設定(このクラスがJPanelなので、省略しても同じ)
		
		for (int i = 0; i < this.btn.length; i++){
			btn[i] = new JButton("btn" + (i + 1));
			this.add(btn[i]);
		}
	}
	public static void main(String[] args){
		new TestFlowLayout();
		JFrame frm2 = new TestFlowLayout();
		frm2.setBounds(100, 150, 300, 250);
	}
}

class TestFlowLayout extends JFrame
{
	public TestFlowLayout()	{
		this.setDefaultCloseOperation(JFrame.DISPOSE_ON_CLOSE);
		this.setTitle("TestFlowLayout");
		JPanel panel = new FlowLayoutPanel();
		this.setContentPane(panel);
		this.setBounds(0, 0, 200, 150);
		this.setVisible(true);
	}
}

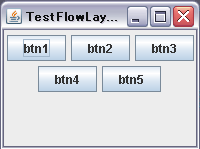
これは、
JPanelのデフォルトの
レイアウトです 

addメソッドによる
部品の配置は、
左から右、 配置できなければ 下へと、 流れるように
配置されます。


絶対位置指定レイアウト
package test;
import java.awt.FlowLayout;//配置のクラスの一つ
import javax.swing.JPanel;
import javax.swing.JFrame;
import javax.swing.JButton;

public class NonLayoutPanel extends JPanel
{
	JButton []btn = new JButton[5];//ボタン配列
	public NonLayoutPanel()
	{
		this.setLayout( null );//Layout指定なし
		for(int i = 0; i < this.btn.length; i++){
			btn[i] = new JButton("btn" + (i + 1));
			btn[i].setBounds(i * 40, i * 20, 60, 25);//位置と幅を指定
			this.add( btn[i] );
		}
		this.setBounds(0, 0, 200, 150);
		this.setVisible(true);
	}

	public static void main(String[] args){
		new TestNonLayout();

		JFrame frm2 = new TestNonLayout();
		frm2.setBounds(100, 150, 300, 250);
	}
}

class TestNonLayout extends JFrame {
	public TestNonLayout(){
		this.setDefaultCloseOperation(JFrame.DISPOSE_ON_CLOSE);
		this.setTitle("TestNonLayout");
		JPanel panel = new NonLayoutPanel();
		this.setContentPane(panel);
		this.setBounds(0, 0, 200, 150);
		this.setVisible(true);
	}
}

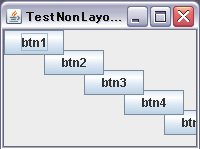
これはsetLayoutで、
nullを指定します。
この時はプログラムで、
配置する部品の絶対位置と
サイズをsetBoundsで 指定する必要があります。


GridLayout
package test;
import java.awt.GridLayout;//配置のクラスの一つ
import javax.swing.JPanel;
import javax.swing.JFrame;
import javax.swing.JButton;

public class GridLayoutPanel extends JPanel{
	JButton []btn = new JButton[5];//ボタン配列
	public GridLayoutPanel(){
		GridLayout layout = new GridLayout(3,2); // 3行,2列
		this.setLayout(layout);
		layout.setVgap(5);//垂直方向の間隔
		layout.setHgap(20);//水平方向の間隔

		for(int i = 0; i < this.btn.length; i++){
			this.btn[i] = new JButton("btn" + (i + 1));
			this.add(btn[i]);
		}
	}
	public static void main(String[] args){
		new TestGridLayout();

		JFrame frm2 = new TestGridLayout();
		frm2.setBounds(100, 150, 300, 250);
	}
}

class TestGridLayout extends JFrame
{
	public TestGridLayout(){
		this.setDefaultCloseOperation(JFrame.DISPOSE_ON_CLOSE);
		this.setTitle("TestGridLayout");
		JPanel panel = new GridLayoutPanel();
		this.setContentPane(panel);
		this.setBounds(0, 0, 200, 150);
		this.setVisible(true);
	}
}

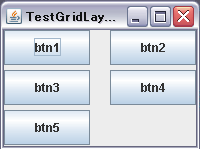
部品を格子状に
配置する時に使います。

addメソッドによる
配置の順番は左上から、
右に配置し、
1つの行が終わったら、
下の行の配置へ進みます。


GridBagLayout
package test;
import java.awt.GridBagLayout;//配置のクラスの一つ
import java.awt.GridBagConstraints;//配置コンポーネントの配置制約指定用
import java.awt.Insets;//コンテナの境界を表現するクラス
import javax.swing.JPanel;
import javax.swing.JFrame;
import javax.swing.JButton;

public class GridBagLayoutPanel extends JPanel{
	JButton []btn = new JButton[5];//ボタン配列
	public GridBagLayoutPanel()
	{
		GridBagLayout layout = new GridBagLayout();
		this.setLayout(layout);
		
		GridBagConstraints constraints = new GridBagConstraints();//制約に使うオブジェクト
		//constraints.fill = GridBagConstraints.BOTH;//【1】縦横にコンポーネットサイズを満たすように配置
		//constraints.weightx = 10.0;//【2】余分の水平スペースを分配
		//constraints.weighty = 10.0;//【3】余分の垂直スペースを分配
		//constraints.insets = new Insets(2, 2, 2, 2);//【4】隙間

		constraints.gridx = 0;	//位置x
		constraints.gridy = 0;	//位置y
		constraints.gridwidth = 1;	//コンポーネントの表示領域のセル数 横
		constraints.gridheight = 2;	//コンポーネントの表示領域のセル数 縦
		layout.setConstraints(btn[0] = new JButton("btn1"), constraints);//現在の制約を使い
		this.add(btn[0]);

		constraints.gridx = 1;	//位置x
		constraints.gridy = 0;	//位置y
		constraints.gridwidth = 2;	//コンポーネントの表示領域のセル数 横
		constraints.gridheight = 1;	//コンポーネントの表示領域のセル数 縦
		layout.setConstraints(btn[1] = new JButton("btn2"), constraints);//現在の制約を使い
		this.add(btn[1]);

		constraints.gridx = 1;	//位置x
		constraints.gridy = 1;	//位置y
		constraints.gridwidth = 1;	//コンポーネントの表示領域のセル数 横
		constraints.gridheight = 1;	//コンポーネントの表示領域のセル数 縦
		layout.setConstraints(btn[2] = new JButton("btn3"), constraints);//現在の制約を使い
		this.add(btn[2]);

		constraints.gridx = 2;	//位置x
		constraints.gridy = 1;	//位置y
		layout.setConstraints(btn[3] = new JButton("btn4"), constraints);//現在の制約を使い
		this.add(btn[3]);

		constraints.gridx = 0;	//位置x
		constraints.gridy = 2;	//位置y
		constraints.gridwidth = 2;	//コンポーネントの表示領域のセル数 横
		layout.setConstraints(btn[4] = new JButton("btn5"), constraints);//現在の制約を使い
		this.add(btn[4]);

	}
	public static void main(String[] args){
		new TestGridBagLayout();

		JFrame frm2 = new TestGridBagLayout();
		frm2.setBounds(100, 150, 300, 250);
	}
}

class TestGridBagLayout extends JFrame
{
	public TestGridBagLayout()
	{
		this.setDefaultCloseOperation(JFrame.DISPOSE_ON_CLOSE);
		this.setTitle("TestGridBagLayout");
		JPanel panel = new GridBagLayoutPanel();
		this.setContentPane(panel);
		this.setBounds(0, 0, 200, 150);
		this.setVisible(true);
	}
}

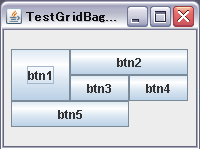
部品を格子状に 指定するものですが、 その時配置する位置大きさを指定できます。

格子状の位置指定する場合は、 GridBagConstraintsオブジェクトの、 そのフィールドgridx 、gridyで 座標を指定し、 gridwidth 、 gridheightフィールドで幅と高さを指定します。
(この部品が使う幅と高さの指定は、 部品が使う格子の数で行います)
その指定したGridBagConstraintsオブジェクトを GridBagLayoutオブジェクトの setConstraintsメソッドで、 ボタンと共に引数で指定し、配置制限を作ります。
そして、このボタンをaddメソッドで配置すること により、 ボタンの位置と大きさが決まります。

その他に次のような レイアウト指定が可能です。
【1】コメントを外す
【2】コメントを外す
【3】コメントを外す
【4】コメントを外す


基本的には、全ての部品を埋めた時にできる長方形の範囲で、 配置における格子の座標を指定します。
右記の場合、 gridx,gridyで指定可能な範囲は、
(0,0)、(1,0)、(2,0)
(0,1)、(1,1)、(2,1)
(0,2)、(1,2)、(2,2)

の範囲となります。

GridBagLayout 例2
package test;
import java.awt.GridBagLayout;//配置のクラスの一つ
import java.awt.GridBagConstraints;//配置コンポーネントの配置制約指定用
import java.awt.Insets;//コンテナの境界を表現するクラス
import javax.swing.JPanel;
import javax.swing.JFrame;
import javax.swing.JButton;

public class GridBagLayoutPanel2 extends JPanel{
	JButton []btn = new JButton[6];//ボタン配列
	public GridBagLayoutPanel2()
	{
		GridBagLayout layout = new GridBagLayout();
		this.setLayout(layout);
		
		GridBagConstraints constraints = new GridBagConstraints();//制約に使うオブジェクト
		//constraints.fill = GridBagConstraints.BOTH;//【1】縦横にコンポーネットサイズを満たすように配置
		constraints.weightx = 1.0;//余分の水平スペースを分配
		constraints.weighty = 1.0;//余分の垂直スペースを分配
		constraints.insets = new Insets(10, 0, 5, 1);//上隙間,左隙間,下隙間,右隙間

		constraints.gridx = 0;	//位置x
		constraints.gridy = 0;	//位置y
		constraints.gridwidth = 3;	//コンポーネントの表示領域のセル数 横
		constraints.gridheight = 1;	//コンポーネントの表示領域のセル数 縦
		layout.setConstraints(btn[0] = new JButton("btn1"), constraints);//現在の制約を使い
		this.add(btn[0]);

		constraints.gridx = 3;	//位置x
		constraints.gridy = 0;	//位置y
		constraints.gridwidth = 1;	//コンポーネントの表示領域のセル数 横
		layout.setConstraints(btn[1] = new JButton("btn2"), constraints);//現在の制約を使い
		this.add(btn[1]);

		constraints.gridx = 0;	//位置x
		constraints.gridy = 1;	//位置y
		constraints.gridwidth = 4;	//コンポーネントの表示領域のセル数 横
		layout.setConstraints(btn[2] = new JButton("btn3"), constraints);//現在の制約を使い
		this.add(btn[2]);

		constraints.gridx = 0;	//位置x
		constraints.gridy = 2;	//位置y
		constraints.gridwidth = 1;	//コンポーネントの表示領域のセル数 横
		layout.setConstraints(btn[3] = new JButton("btn4"), constraints);//現在の制約を使い
		//this.add(btn[3]);【2】

		constraints.gridx = 1;	//位置x
		constraints.gridy = 2;	//位置y
		layout.setConstraints(btn[4] = new JButton("btn5"), constraints);//現在の制約を使い
		//this.add(btn[4]);【3】
		
		constraints.gridx = 2;	//位置x
		constraints.gridy = 2;	//位置y
		layout.setConstraints(btn[5] = new JButton("btn6"), constraints);//現在の制約を使い
		//this.add(btn[5]);//【4】
	}
	public static void main(String[] args){
		new TestGridBagLayout2();

		JFrame frm2 = new TestGridBagLayout2();
		frm2.setBounds(100, 150, 300, 250);
		frm2.validate();
	}
}

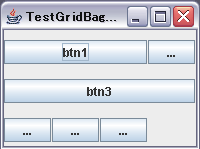
部品を格子状で、 位置大きさを指定して、 配置できるのですが、 配置する部品が、 それぞれの格子座標に対し、 一箇所以上で指定しないと、 希望のサイズや位置にならない場合があります。
それは、 addで追加する部品全体で 格子サイズが決まるためです。

右記では、btn1のサイズを3、 btn3のサイズを4にしていますが、 下で実験できるように 希望のサイズになりません。

【1】コメントを外す
【2】コメントを外す
【3】コメントを外す
【4】コメントを外す


指定のサイズになるためには、 上記チェックボックスを チェックして、 コメント部がない設定にする 必要があります。
btn4, btn5, btn6の ボタンが横に並んで 存在することにより、 btn1で必要な 3つの 格子が有効となって、 希望の幅でになります。

パネルを組み合わせたレイアウトです。

既存パネル組み合わせ
package test;
import java.awt.BorderLayout;
import javax.swing.JPanel;
import javax.swing.JFrame;
import javax.swing.JButton;

public class TestJPanel3 extends JPanel{
	public TestJPanel3(){
		this.setLayout(new BorderLayout());
		this.add(new GridLayoutPanel(), BorderLayout.WEST);//上記で作ったパネル
		this.add(new FlowLayoutPanel(), BorderLayout.CENTER);//上記で作ったパネル
		this.add(new BorderLayoutPanel(), BorderLayout.EAST);//上記で作ったパネル
	}

	public static void main(String[] args){
		new TestJPanel3Frm();
		JFrame frm2 = new TestJPanel3Frm();
		frm2.setBounds(100, 150, 500, 250);
		frm2.setVisible(true);
		frm2.validate();
	}
}

class TestJPanel3Frm extends JFrame
{
	public TestJPanel3Frm()	{
		this.setDefaultCloseOperation(JFrame.DISPOSE_ON_CLOSE);
		this.setTitle("TestJPanel3Frm");
		JPanel panel = new TestJPanel3();
		this.setContentPane(panel);
		this.setBounds(0, 0, 200, 150);
		this.setVisible(true);
	}
}

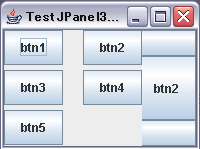
これまで作ったパネルクラスを
再利用する例です。


フレームのパネルに 新たななBorderLayoutのパネルを作り、 それに、既存の GridLayoutPanel, FlowLayoutPanel, BorderLayoutPanelを使っています。

CardLayout
package test;
import java.awt.BorderLayout;
import java.awt.CardLayout;
import java.awt.event.ItemListener;
import java.awt.event.KeyEvent;
import javax.swing.JPanel;
import javax.swing.JFrame;
import javax.swing.JRadioButton;
import javax.swing.ButtonGroup;

public class CardLayoutPanel extends JPanel implements ItemListener {
	JPanel top = new JPanel(); //ラジオボタン配置用の上部配置パネル
	JPanel card = new JPanel(); //CardLayoutを設定する中央配置のパネル
	CardLayout cardLayout = new CardLayout();	//カードレイアウト記憶用

	ButtonGroup group = new ButtonGroup();	//グループ化用オブジェクト生成
	JRadioButton rBtn1 = new JRadioButton("Flow");
	JRadioButton rBtn2 = new JRadioButton("Non");
	JRadioButton rBtn3 = new JRadioButton("GridBag");

	public CardLayoutPanel(){
		this.setLayout(new BorderLayout());
		this.add(top, BorderLayout.NORTH);
		this.add(card, BorderLayout.CENTER);
		
		card.setLayout(cardLayout);
		card.add(new FlowLayoutPanel(), "1");//上記で作ったパネル
		card.add(new NonLayoutPanel(), "2");//上記で作ったパネル
		card.add(new GridBagLayoutPanel(), "3");//上記で作ったパネル

		top.add(rBtn1);	//ラジオボタンをパネルへ配置
		top.add(rBtn2);
		top.add(rBtn3);
		
		rBtn1.setSelected(true);//ラジオボタンの状態設定
		group.add(rBtn1);//ラジオボタンのグループ化
		group.add(rBtn2);
		group.add(rBtn3);
		
		//Altキー連携ショートカット用キー設定
		rBtn1.setMnemonic(KeyEvent.VK_F);
		rBtn2.setMnemonic(KeyEvent.VK_N);
		rBtn3.setMnemonic(KeyEvent.VK_B);

		//項目の選択・解除のメソッドを持つオブジェクトを指定(イベントの登録)
		rBtn1.addItemListener(this);
		rBtn2.addItemListener(this);
		rBtn3.addItemListener(this);
	}

	//ユーザにる項目の選択・解除で実行する
	public void itemStateChanged(java.awt.event.ItemEvent e)
	{
		Object obj = e.getSource();	//イベント発生オブジェクト取得
		if (obj == rBtn1){
			cardLayout.show(card, "1");//カードの切り替え
		}else if (obj == rBtn2)	{
			cardLayout.show(card, "2");
		}else if (obj == rBtn3)	{
			cardLayout.show(card, "3");
		}
	}

	public static void main(String[] args){
		new TestCardLayout();
		JFrame frm2 = new TestCardLayout();
		frm2.setBounds(100, 150, 500, 250);
		frm2.setVisible(true);
		frm2.validate();
	}
}

class TestCardLayout extends JFrame
{
	public TestCardLayout(){
		this.setDefaultCloseOperation(JFrame.DISPOSE_ON_CLOSE);
		this.setTitle("TestCardLayout");
		JPanel panel = new CardLayoutPanel();
		this.setContentPane(panel);
		this.setBounds(0, 0, 200, 150);
		this.setVisible(true);
	}
}

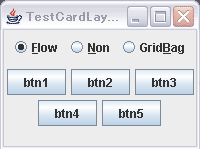
これまで作ったパネルクラスを CardLayoutのパネルに入れて 管理する例です。
(CardLayoutは、レイアウトパネルに 登録したコンポーネントを 切り替える機能です)


上記フレームのパネルに使っているのが、 このCardLayoutPanelです。
これは、BorderLayoutのレイアウトで、 CENTERに配置するcardフィールドの パネルを、CardLayoutにしています。
このパネルに 既存の FlowLayoutPanel, NonLayoutPanel, GridBagLayoutPanel生成し、 名前"1", "2", "3" を指定してaddで登録しています。

CardLayoutは、このaddで追加した 内のどれか一つを前面に表示するレイアウトです。
切り替えは、 cardLayout.showメソッドで、 addの登録時に使った名前を指定します。

なお、このcardパネルの上部には、切り替え用の 新規パネルを追加して、 そこにラジオボタンを配置しています。
ラジオボタンのように状態が変化したかで 処理するイベント用インターフェイスには、 ItemListenerが使われ、それをimplementsしています。
また、どれか一つのラジオぼたんだけをtrueにする設定は、 ButtonGroupオブジェクトを作り、それにボタンをaddすることで 行っています。

BoxLayout
package test;
import javax.swing.BoxLayout;//配置のクラスの一つ(Swingのみ使用可能)
import javax.swing.Box;//配置のクラスの一つ(Swingのみ使用可能)
import javax.swing.JComponent;
import javax.swing.JPanel;
import javax.swing.JFrame;
import javax.swing.JButton;

public class BoxLayoutPanel extends JPanel
{
	JButton []btn = new JButton[5];//ボタン配列
	public BoxLayoutPanel()
	{
		this.setBackground(new java.awt.Color(255, 200, 200));//ラベルの背景色設定
		BoxLayout layout0 = new BoxLayout(this, BoxLayout.Y_AXIS);
		//this.setLayout(layout0);//【1】このパネルをFlowLayoutからBoxLayoutへ変更
		
		JPanel panel1 = new JPanel();
		panel1.setBackground(new java.awt.Color(200, 255, 200));//ラベルの背景色設定
		BoxLayout layout1 = new BoxLayout(panel1, BoxLayout.X_AXIS);
		panel1.setLayout(layout1);

		this.btn[0] = new JButton("btn1");
		btn[0].setAlignmentY(JComponent.TOP_ALIGNMENT);
		panel1.add(btn[0]);

		//panel1.add(Box.createHorizontalGlue());  //【2】横方向の伸縮スペース

		this.btn[1] = new JButton("btn2");
		btn[1].setAlignmentY(JComponent.CENTER_ALIGNMENT);
		panel1.add(btn[1]);

		this.btn[2] = new JButton("btn3");
		btn[2].setAlignmentY(JComponent.BOTTOM_ALIGNMENT);
		panel1.add(btn[2]);

		JPanel panel2 = new JPanel();
		panel2.setBackground(new java.awt.Color(200, 200, 255));//ラベルの背景色設定
		BoxLayout layout2 = new BoxLayout(panel2, BoxLayout.Y_AXIS);
		panel2.setLayout(layout2);

		this.btn[3] = new JButton("btn4");
		panel2.add(btn[3]);

		//panel2.add(Box.createRigidArea(new java.awt.Dimension(100, 10)));//【3】固定サイズのスペース

		this.btn[4] = new JButton("btn5");
		panel2.add(btn[4]);

		this.add(panel1);

		//this.add(Box.createVerticalGlue()); //【4】縦方向の伸縮スペース

		this.add(panel2);
	}

	public static void main(String[] args){
		new TestBoxLayout();

		JFrame frm2 = new TestBoxLayout();
		frm2.setBounds(100, 150, 500, 250);
		frm2.validate();
	}
}

class TestBoxLayout extends JFrame {
	public TestBoxLayout(){
		this.setDefaultCloseOperation(JFrame.DISPOSE_ON_CLOSE);
		this.setTitle("TestBoxLayout");
		JPanel panel = new BoxLayoutPanel();
		this.setContentPane(panel);
		this.setBounds(0, 0, 200, 150);
		this.setVisible(true);
	}
}

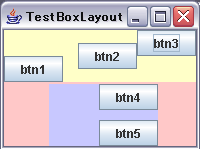
部品を垂直方向または、 水平方向に並べて配置するレイアウトです。
右記では、BoxLayoutPanelの中に、
横方向のBoxLayoutを施して、ボタンを3つ配置したpanel1 と、
縦方向のBoxLayoutを施して、ボタンを2つ配置したpanel2 を、 配置しています。


【1】コメントを外す
【2】コメントを外す
【3】コメントを外す
【4】コメントを外す

【1】の コードがあると、BoxLayoutPanelは BoxLayoutになり、 panel1とpanel2 が縦に配置されます。
これが コメントになると、BoxLayoutPanelは、 デフォルトのFlowLayoutで、 panel1とpanel2が配置されます。
【2】の コードがあると、横方向で余分なスペースがある 時だけ、btn1とbtn2の間にスペースを作ります。 これは、Boxクラスのオブジェクトです。
同様に、【4】の コードがあると、縦方向で余分なスペースがある 時だけ、panel1とpanel2の間にスペースを作ります。 (これは、BoxLayoutPanelが、BoxLayoutでないと 正しく動作しません。)

【3】の コードがあると、 Boxオブジェクトで、 100×10の長方形が作られ、 それが btn4とbtn5の間に配置されます。