BlenderのPythonスクリプト自作ライブラリ(beditsub.py)
Blender初心者が最初に覚えるべき内容をまとめたページは、このリンクにあります。
Blender初心者が最初に覚えるべきスクリプトをまとめたページは、このリンクにあります。
このページは、Blender(Portable_4.1.1)のPythonスクリプトで、それを利用した自作ライブラリ(beditsub.py)を紹介するページです。
参考:https://docs.blender.org/api/current/
以下の関数を定義しています。
下記は、beditsub.pyの名前で作成し、'D:\\work'に配置して利用しています。
(以下は、Pythonコンソールに貼り付けて、実行を確認しています。)
(上記で示すbeditsub.pyの自作モジュールを利用しています)
 カメラとライト以外を削除した後、ICO球を生成し、
(2, 0.0, 0.0)の位置に近い面を選択しています。
カメラとライト以外を削除した後、ICO球を生成し、
(2, 0.0, 0.0)の位置に近い面を選択しています。
その後で、その選択面をX方向の0.5だけ移動している。
(上記で示すbeditsub.pyの自作モジュールを利用しています)
 カメラとライト以外を削除した後、平面を生成し、編集モードにして、引数の平面で切断する。
その後、非選択にしてから(0.0, 0.0, 1.0)の位置に近い辺を求めて選択しています。
その後で、その選択辺をZ方向に1だけ移動している。
(上記で示すbeditsub.pyの自作モジュールを利用しています)
 カメラとライト以外を削除した後、円柱を生成し、
指定位置に近い頂点を3個選択しています。
その後、その3点を移動する例です。
(上記で示すbeditsub.pyの自作モジュールを利用しています)
 カメラとライト以外を削除した後、円を生成し、
指定位置(0.0, 2.0, 2.0)に最も近い頂点の添え字を取得後、その添え字の頂点の座標を表示し、移動している例
(上記で示すbeditsub.pyの自作モジュールを利用しています)
 円錐の一部をset_select_renageで選択して移動する例
(上記で示すbeditsub.pyの自作モジュールを利用しています)
 uv_sphere(U軸,V軸 展開の球)の左半分を選択し、それをY軸で縮めます。
次に右半分を選択し直して、それを伸ばす例
(上記で示すbeditsub.pyの自作モジュールを利用しています)
 グリッド生成してその中心の頂点を選択後、その頂点の添え字リストを取得しています。
次にその頂点をプロポーショナル編集でZ軸方向に移動ししています。
そして、頂点の添え字の前後を含めたリストから、それら頂点を選択状態にしています。
(上記で示すbeditsub.pyの自作モジュールを利用しています)
| 概要 | 関数ヘッダー と 補足説明 |
|---|---|
| 全ての頂点、辺、面を非選択する | deselect_all_elements(obj, set_edit_mode = True) 任意モードで、bpy.types.Object型のobjの中の全てを非選択にする。(実行でモードは変化しません) |
| 最も近い面と距離を返す | get_index_closest_face(obj, target_location, exclude_idx=[], far_distance=0,set_select=True,set_edit_mode = True) 任意モードで、bpy.types.Object型のobjの中の全て面で、target_locationに最も近い面の添え字と距離を返す。 exclude_idxのリストにある添え字は、探す対象から除外して探します。 この検索は、far_distanceの距離より遠い面を探す。 set_selectがTrueで、対象の面を選択状態にする。なおset_edit_modeがTrueで、編集モード状態でreturnする。 |
| 最も近い辺と距離を返す | get_index_closest_edge(obj, target_location, exclude_idx=[], far_distance=0,set_select=True,set_edit_mode = True): (任意モードで実行可能で、モード変化なし定可能) |
| 最も近い頂点(vertex)と距離を返す | get_index_closest_vert(obj, target_location, exclude_idx=[],far_distance=0,set_select=True,set_edit_mode = True): (任意モードで実行可能で、モード変化なし指定可能) |
| vert_idxの添え字が示す頂点座標を返す | getVector(obj, vert_idx): obj 内の頂点で、vert_idxの添え字が示す頂点の座標「Vectorの(x,y,z)」を返す。 (任意モードで実行可能で、モード変化なし) |
| objの直方体内頂点の選択状態を設定 | set_select_renage(obj, xmin=-sys.float_info.max, xmax=sys.float_info.max,
ymin=-sys.float_info.max, ymax=sys.float_info.max, zmin=-sys.float_info.max, zmax=sys.float_info.max, setSelect=True): EDIT モードの頂点選択モードで使う前提の関数です。 範囲を省略することで、指定座標以上、指定座標以下の位置にある頂点群の選択が可能) |
| objの選択頂点群をY軸の平行移動で伸び縮させる | move_parallel_y(obj, param=0.5, base_Y=0, func=lambda x,param : x*param, selected=True): EDIT モードの頂点選択モードで使う前提の関数です。 デフォルトのfunc関数であれば、「距離×比率のparam」だけ移動します。これはy方向に潰したり、膨らませた形状へ変更する場合に使います。 |
| 選択された頂点の添え字リストを得る関数 | get_selected_vertex_indices(obj): EDIT モードの頂点選択モードで使う前提の関数です。 このBMeshの頂点用リストであるvertsで、選択状態の頂点の添え字をリストにして返す。つまり、intのリストを返します。 |
| 頂点の添え字リストからオブジェクトの頂点を選択状態にする | select_vertices_by_indices(obj, indices_list): EDIT モードの頂点選択モードで使う前提の関数です。 get_selected_vertex_indices関数の逆操作で、intのリストが第2引数です。 この番号は、obj.dataに対応するBMeshのvertsのリスト内を示す添え字です。 |
import sys
import time
import math
import bpy
import bmesh
import mathutils
from mathutils import Matrix
from mathutils import Vector

logfile = None
def log_print(s): # ログ記憶用(デバック用)
    if logfile:
        logfile.write(s)
    #

# 引数のobjに対して、編集モードで全ての頂点、辺、面を非選択する
def deselect_all_elements(obj, set_edit_mode = True):
    ''' 編集モードに変更してからobjの全ての頂点、辺、面を非選択する。
        set_edit_modeがFalseであれば、もとモード('EDIT'または'OBJECT')に戻します '''
    mode = bpy.context.active_object.mode # 'EDIT'や'OBJECT'を記憶
    active_obj = bpy.context.view_layer.objects.active
    if mode != 'EDIT' : # 編集モードでなければ、編集モードにする
        bpy.context.view_layer.objects.active = obj
        bpy.ops.object.mode_set(mode='EDIT')
    mesh = obj.data
    bm = bmesh.from_edit_mesh(mesh)
    for vert in bm.verts: vert.select = False# 全ての頂点を非選択に設定
    for edge in bm.edges: edge.select = False# 全ての辺を非選択に設定
    for face in bm.faces: face.select = False# 全ての面を非選択に設定
    bmesh.update_edit_mesh(mesh) # BMeshを更新して選択状態を反映
    if mode != 'EDIT' and set_edit_mode != True: # 元のモードに戻す
        bpy.ops.object.mode_set(mode=mode)
        bpy.context.view_layer.objects.active=active_obj

# obj で最もtarget_locationの位置に近い面の添え字と、その距離を返す
def get_index_closest_face(obj, target_location, exclude_idx=[], far_distance=0,set_select=True,set_edit_mode = True):
    '''    obj で最もtarget_locationの位置に近い面の添え字と、その距離を返す
        exclude_idxのリストにある添え字は、探す対象から除外して探します。
        この検索は、far_distanceの距離より遠い面を探す。
        set_selectがTrueで、その面を選択状態にする。
        この実行で、編集モードは面選択モードになる。なおset_edit_modeがTrueで、編集モード状態でreturnする
    '''
    mode = bpy.context.active_object.mode
    active_obj = bpy.context.view_layer.objects.active
    if mode != 'EDIT' : # 編集モードでなければ、編集モードにする
        bpy.context.view_layer.objects.active = obj
        bpy.ops.object.mode_set(mode='EDIT')
    bpy.ops.mesh.select_mode(use_extend=False, use_expand=False, type='FACE')
    mesh = obj.data
    bm = bmesh.from_edit_mesh(mesh)
    closest_face = None
    min_distance = float('inf') # floatの最大値
    for i, face in enumerate(bm.faces): # BMFaceの繰り返し
        if i in exclude_idx: continue
        closest_point = face.calc_center_median()
        distance = (closest_point - target_location).length # 面との距離
        if distance < min_distance and distance > far_distance:
            min_distance = distance # 最小距離を更新
            closest_face = face # BMFace
    if set_select == True and closest_face:
        closest_face.select=True # 最短面を選択状態
        bmesh.update_edit_mesh(obj.data) # BMeshを更新して選択状態を反映
    if mode != 'EDIT' and set_edit_mode != True: # 元のモードに戻す
        bpy.ops.object.mode_set(mode=mode)
        bpy.context.view_layer.objects.active=active_objmesh(obj.data) # BMeshを更新して選択状態を反映
    return closest_face.index, min_distance # 近い面の添え字と 距離を返す

# obj で最もtarget_locationの位置に近い辺の添え字と、その距離を返す
def get_index_closest_edge(obj, target_location, exclude_idx=[], far_distance=0,set_select=True,set_edit_mode = True):
    '''    obj で最もtarget_locationの位置に近い辺の添え字と、その距離を返す
        exclude_idxのリストにある添え字は、探す対象から除外して探します。
        この検索は、far_distanceの距離より遠い辺を探す。
        set_selectがTrueで、その面を選択状態にする。
        この実行で、編集モードは面選択モードになる。なおset_edit_modeがTrueで、編集モード状態でreturnする
    '''
    mode = bpy.context.active_object.mode
    active_obj = bpy.context.view_layer.objects.active
    if mode != 'EDIT' : # 編集モードでなければ、編集モードにする
        bpy.context.view_layer.objects.active = obj
        bpy.ops.object.mode_set(mode='EDIT')
    bpy.ops.mesh.select_mode(use_extend=False, use_expand=False, type='EDGE')# 辺選択状態
    bm = bmesh.from_edit_mesh(obj.data)
    closest_edge = None
    min_distance = float('inf') # floatの最大値
    for i, edge in enumerate(bm.edges): # BMEdgeの繰り返し
        if i in exclude_idx: continue
        v1, v2 = edge.verts
        center_point = (v1.co + v2.co) * 0.5# 頂点の座標を足し合わせて中心点を計算
        distance = (center_point - target_location).length # 面との距離
        if distance < min_distance and distance > far_distance:
            min_distance = distance # 最小距離を更新
            closest_edge = edge # BMEdge
    if set_select == True and closest_edge:
        closest_edge.select=True # 最短辺を選択状態
        bmesh.update_edit_mesh(obj.data) # BMeshを更新して選択状態を反映
    if mode != 'EDIT' and set_edit_mode != True: # 元のモードに戻す
        bpy.ops.object.mode_set(mode=mode)
        bpy.context.view_layer.objects.active=active_obj
    return closest_edge.index, min_distance

# obj で最もtarget_locationの位置に近い頂点の添え字と、その距離を返す
def get_index_closest_vert(obj, target_location, exclude_idx=[],far_distance=0,set_select=True,set_edit_mode = True):
    '''    obj で最もtarget_locationの位置に近い頂点の添え字と、その距離を返す
        exclude_idxのリストにある添え字は、探す対象から除外して探します。
        この検索は、far_distanceの距離より遠い辺を探す。
        set_selectがTrueで、その面を選択状態にする。
        この実行で、編集モードは頂点選択モードになる。なおset_edit_modeがTrueで、編集モード状態でreturnする
    '''
    mode = bpy.context.active_object.mode
    active_obj = bpy.context.view_layer.objects.active
    if mode != 'EDIT' : # 編集モードでなければ、編集モードにする
        bpy.context.view_layer.objects.active = obj
        bpy.ops.object.mode_set(mode='EDIT')
    bpy.ops.mesh.select_mode(use_extend=False, use_expand=False, type='VERT') # 頂点選択モード
    bm = bmesh.from_edit_mesh(obj.data)
    closest_vert = None
    min_distance = float('inf') # floatの最大値
    for i, vert in enumerate(bm.verts): # BMVertの繰り返し
        if i in exclude_idx: continue
        distance = (vert.co - target_location).length #頂点との距離
        if distance < min_distance and distance > far_distance:
            min_distance = distance # 最小距離を更新
            closest_vert = vert # 'BMVert'
    if set_select == True and closest_vert:
        closest_vert.select=True # 最短辺を選択状態
        bmesh.update_edit_mesh(obj.data) # BMeshを更新して選択状態を反映
    if mode != 'EDIT' and set_edit_mode != True: # 元のモードに戻す
        bpy.ops.object.mode_set(mode=mode)
        bpy.context.view_layer.objects.active=active_obj
    return closest_vert.index, min_distance

# obj 内の頂点で、vert_idxの添え字が示す頂点の座標「Vectorの(x,y,z)」を返す。(任意モードで変換なし)
def getVector(obj, vert_idx):
    mode = bpy.context.active_object.mode
    active_obj = bpy.context.view_layer.objects.active
    if mode != 'EDIT' : # 編集モードでなければ、編集モードにする
        bpy.context.view_layer.objects.active = obj
        bpy.ops.object.mode_set(mode='EDIT')
    bm = bmesh.from_edit_mesh(obj.data)
    verts_list=list(bm.verts)
    vect3 = verts_list[vert_idx].co
    if mode != 'EDIT' : # 元のモードに戻す
        bpy.ops.object.mode_set(mode=mode)
        bpy.context.view_layer.objects.active=active_obj
    return vect3 # 頂点座標

# objの頂点で、xmin~xmax, ymin~ymax, zmin~zmax の直方体で囲まれる頂点の選択状態を設定する. (xminなどの境界値を含む範囲とする)
# (EDIT モードの頂点選択モードで使う前提の関数です。範囲を省略することで、指定座標以上、指定座標以下の位置にある頂点群の選択が可能)
def set_select_renage(obj, xmin=-sys.float_info.max, xmax=sys.float_info.max, ymin=-sys.float_info.max, ymax=sys.float_info.max, \
	zmin=-sys.float_info.max, zmax=sys.float_info.max, setSelect=True):
    bm = bmesh.from_edit_mesh(obj.data)
    for i, vert in enumerate(bm.verts): # BMVertの繰り返し
        if vert.co.x >= xmin and vert.co.x <= xmax and vert.co.y >= ymin and vert.co.y <= ymax and vert.co.z >= zmin and vert.co.z <= zmax:
            vert.select=setSelect # 直方体で囲まれた頂点の選択状態を変更
    bmesh.update_edit_mesh(obj.data) # BMeshを更新して選択状態を反映

# objの頂点群を、y軸方向で平行移動させる。移動量は、各頂点とbase_Y座標との距離に対して、paramを使った引数の関数で決まります。
# デフォルトの関数であれば、「距離×比率のparam」だけ移動します。これはy方向に潰したり、膨らませた形状へ変更する場合に使います。
# selectedがデフォルトのTrueであれば、選択状態の頂点が移動し、Falseであれば全ての頂点が移動対象となります。
# (EDIT モードの頂点選択モードで使う前提の関数です。
def move_parallel_y(obj, param=0.5, base_Y=0, func=lambda x,param : x*param, selected=True):
    bm = bmesh.from_edit_mesh(obj.data)
    for i, vert in enumerate(bm.verts): # BMVertの繰り返し
        if selected and vert.select==False: continue
        vert.co.y += func(base_Y - vert.co.y, param)
    bmesh.update_edit_mesh(obj.data) # BMeshを更新して選択状態を反映

# オブジェクトから、選択された頂点の添え字リストを得る関数
def get_selected_vertex_indices(obj):
    bm = bmesh.from_edit_mesh(obj.data) # obj.dataの'bpy_types.Mesh'を引数に、BMeshを得る。
    selected_verts = [v for v in bm.verts if v.select] # 選択状態の頂点リストを得る
    return [v.index for v in selected_verts] # 頂点リストから、その頂点の添え字リストを得る

# 上記関数の逆操作で、頂点の添え字リストからオブジェクトの頂点を選択状態にする
def select_vertices_by_indices(obj, indices_list):
    bm = bmesh.from_edit_mesh(obj.data) # obj.dataの'bpy_types.Mesh'を引数に、BMeshを得る。
    bm.verts.ensure_lookup_table() # BMeshがインデックステーブルを保持させる。(添え字操作前で必要)
    for index in indices_list:
        vert = bm.verts[index]
        vert.select = True
    bmesh.update_edit_mesh(obj.data) # BMeshを更新して選択状態を反映

# objの中で、idxの添え字が示す頂点のx,y,zをメンバに持つVectorを返す。
def get_at(obj, idx):
    bm = bmesh.from_edit_mesh(obj.data) # obj.dataの'bpy_types.Mesh'を引数に、BMeshを得る。
    vs = bm.verts # BMVertSeq取得
    vs.ensure_lookup_table() # BMeshがインデックステーブルを保持させる。(添え字操作前で必要)
    bv = vs[idx] # BMVert取得
    return bv.co # Vectorを戻す。(Vectorは、x,y,xの座標)

# オブジェクトから、選択された辺の添え字リストを得る関数
def get_selected_edges_indices(obj):
    bm = bmesh.from_edit_mesh(obj.data) # obj.dataの'bpy_types.Mesh'を引数に、BMeshを得る。
    selected_edges = [e for e in bm.edges if e.select] # 選択状態の頂点リストを得る
    return [e.index for e in selected_edges] # 頂点リストから、その頂点の添え字リストを得る

# 上記関数の逆操作で、辺の添え字リストからオブジェクトの辺を選択状態にする
def select_edges_by_indices(obj, indices_list):
    bm = bmesh.from_edit_mesh(obj.data) # obj.dataの'bpy_types.Mesh'を引数に、BMeshを得る。
    bm.edges.ensure_lookup_table() # BMeshがインデックステーブルを保持させる。(添え字操作前で必要)
    for index in indices_list:
        edg = bm.edges[index]
        edg.select = True
    bmesh.update_edit_mesh(obj.data) # BMeshを更新して選択状態を反映

# 以下はbpy.context.view_layer.update利用の生成関数-----------------------------------------------------

# 引数startの点の位置に、引数endの点の方向を向けるように回転した円を生成する関数
def create_oriented_circle(start, end, name, vertices=8,radius=0.5, scale=(1, 1, 1) ):
    '''  start: 円の中心となる点(mathutils.Vector)
         end: 円が向かうべき方向を示す点(円周上の点ではなく、方向ベクトル)
         オブジェクトモードに切り替えて、名前を付けた円を生成
    '''
    if bpy.context.mode != 'OBJECT':bpy.ops.object.mode_set(mode='OBJECT')# オブジェクトモードに切り替え
    #
    direction = end - start # 方向ベクトルを取得
    direction.normalize()  # 正規化
    z_axis = -direction # (法線を外向きにするため、-演算子で反転)
    x_axis = Vector((1.0, 0.0, 0.0))  # X軸の基準
    y_axis = z_axis.cross(x_axis)  # Z軸に垂直なY軸を計算
    x_axis = y_axis.cross(z_axis)  # 最終的なX軸を再計算
    rotation_matrix = Matrix((x_axis, y_axis, z_axis)).transposed()
    rotation_euler = rotation_matrix.to_euler('XYZ')# 回転行列からオイラー角 (XYZ順で取得)
    bpy.ops.mesh.primitive_circle_add(location=(start), vertices=vertices,radius=radius)
    obj = bpy.context.active_object # 直前でアクセスしたオブジェク
    obj.name = name # 名前を付ける
    obj.scale = scale
    if direction.y==0 and direction.z==0: # 回転行列の特殊状態
        if direction.x > 0: rotation_euler.y = -math.pi/2
        if direction.x < 0: rotation_euler.y = math.pi/2
    obj.rotation_euler=rotation_euler # 角度をendの方向の向きに設定
    bpy.context.view_layer.update() # 操作の完了を明示的に待つ
    return rotation_euler # 向いた方法のオイラー角を返す。

def create_raised_surface(obj, dir, radius, number_to_generate=3, ratio=0.7 ):
    ''' objの選択中のループ辺で、dirの指定方向にradiusの盛り上がり面を作る。
        このループ辺を、dirの正規化したベクトル方向へ、number_to_generate回押し出して作ります。
        押し出し直後はratioの減衰比率でリサイズして、最後の押し出しはリングに面を作る。
        選択中のループ辺は、実行後も選択状態を維持する。
    '''
    bpy.ops.object.mode_set(mode='EDIT')# 編集モードに切り替え
    bpy.ops.mesh.select_mode(use_extend=False, use_expand=False, type='EDGE') # 辺選択モード
    indices=get_selected_edges_indices(obj) # 選択状態の辺の添え字群リスト取得
    dir.normalize() # 正規化
    number_to_generate=3
    cumulative_extrusion_amount=0 # 累計の押し出し量
    reduction_ratio=1
    for n in range(number_to_generate):
        extrusion_amount= (radius-cumulative_extrusion_amount)/2 # 押し出し量
        cumulative_extrusion_amount+=extrusion_amount# 累計の押し出し量更新
        bpy.ops.mesh.extrude_context_move(TRANSFORM_OT_translate={"value": tuple(dir*extrusion_amount)})# 押し出し処理
        reduction_ratio*=ratio  # 減衰比で縮める
        bpy.ops.transform.resize(value=(reduction_ratio, reduction_ratio, reduction_ratio))# サイズ変更処理
    #
    bpy.ops.mesh.fill() # 面を生成
    deselect_all_elements(obj) # objの内部を全て非選択にする。
    select_edges_by_indices(obj, indices) # 最初の輪の選択復元
    bpy.context.view_layer.update() # 操作の完了を明示的に待つ

def extrude_to_postion(obj, start, end, ratios=[1], steps=[]):
    ''' objの中の選択状態の辺ループを、指定された位置に押し出す。(extrude to the specified position)
        startから endへ、ratiosの要素数の回数だけ押し出します。この各押し出しで、ratiosの要素は各押し出し後のリサイズの比率
        # 編集モードで実行する。
    '''
    direction_normalize = end - start # 方向ベクトルを取得
    distance = (start-end).length # 距離を計算
    direction_normalize.normalize()  # 正規化
    extrusion_amount=distance/len(ratios)
    for i in range( len(ratios) ):
        if len(steps) < len(ratios):
            bpy.ops.mesh.extrude_context_move(TRANSFORM_OT_translate={"value": tuple(direction_normalize*extrusion_amount)})# 押し出し処理
        else:
            bpy.ops.mesh.extrude_context_move(TRANSFORM_OT_translate={"value": tuple(direction_normalize*steps[i])})# 押し出し処理
        #
        bpy.ops.transform.resize(value=(ratios[i], ratios[i], ratios[i]))# サイズ変更処理
    #
    bpy.context.view_layer.update() # 操作の完了を明示的に待つ


def create_bar(start, end, name, radius=0.05, vertices=8, ratios=[1], scale=(1, 1, 1) , steps=[]):
    ''' 指定された位置に棒のオブジェクトを生成
        棒の位置は、startからendの位置に作ります。radius:棒の半径、各押し出しで、ratiosの要素は各押し出し後のリサイズの比率
	# オブジェクトモードで実行する必要があります。
    '''
    create_oriented_circle(start, end, name, vertices=vertices,radius=radius,scale=scale ) # 指定方向への円の生成
    obj = bpy.context.active_object # 直前でアクセスしたオブジェク
    create_raised_surface(obj, start-end, radius=radius, number_to_generate=3, ratio=0.7 ) # 棒先端の丸みを作る
    extrude_to_postion(obj, start, end, ratios=ratios, steps=steps) # 棒を伸ばす
    create_raised_surface(obj, end-start, radius=radius, number_to_generate=3, ratio=0.7 ) # 棒先端の丸みを作る
    bpy.ops.object.mode_set(mode='OBJECT')# オブジェクトモードに切り替え
    bpy.context.view_layer.update() # 操作の完了を明示的に待つ
    return obj # 生成したオブジェクト

def adding_flesh_to_bone(armature, bone_name, radius=0.05, vertices=8, ratios=[1], scale=(1, 1, 1) ):
    '''
	二つの座標を結ぶ太い棒を作る処理を作って、一つのボーンを指定することで、受肉するイメージの棒を作る関数
	生成されるオブジェクトが戻ります。(実行によりオブジェクトモードになります。)
	:param armature: 指定Boneを持つアーマチュアのオブジェクト
	armatureの中で、指定の名前のBoneに棒のオブジェクトを生成(名前は、Boneの名前に'B_'の接頭辞が付きます。)
        radius:棒の半径、各押し出しで、ratiosの要素は各押し出し後のリサイズの比率
	# 最終的オブジェクトモードになります。
    '''
    if bpy.ops.object:
        bpy.ops.object.mode_set(mode='OBJECT')# オブジェクトモードに切り替え
        bpy.ops.object.select_all(action='DESELECT') # 全てのオブジェクトの選択を解除
    #
    bpy.context.view_layer.objects.active = armature
    armature.select_set(True) # アーマチアオブジェクトを選択状態へ
    bpy.ops.object.mode_set(mode='EDIT')# 編集モードに切り替え
    edit_bone = armature.data.edit_bones.get( bone_name ) # 対象Bone取得(編集モードで可能)
    start = edit_bone.head.__copy__() # ヘッド位置を取得(ローカル座標)
    end = edit_bone.tail.__copy__() # テール位置を取得(ローカル座標)
    bpy.context.view_layer.update() # 操作の完了を明示的に待つ
    log_print(f"{edit_bone.name}:{start},{end},-----------------\n")
    obj_name=f"{'B_'+edit_bone.name}"
    bar_obj=create_bar(start, end, obj_name, radius=radius, vertices=vertices, ratios=ratios, scale=scale)
    return bar_obj

def split_nearest_faceN(obj, location, subdivisions=1, n=1):
    bpy.context.view_layer.objects.active = obj
    bpy.ops.object.mode_set(mode='EDIT')# 編集モードに変更
    bm = bmesh.from_edit_mesh(obj.data)# BMeshにアクセス
    target_location = Vector(location)# 指定位置のVector化
    facesN=[] # 走査対象の面
    while n > 0: # 指定位置近傍の面をn個を、
        nearest_face = None # 指定位置の近傍の面をfacesNに記憶
        min_distance = float('inf') # floatの最大値
        for face in bm.faces: # BMFaceの繰り返し
            if face in facesN: continue
            closest_point = face.calc_center_median() # 面の中央となるVectorの取得
            distance = (closest_point - target_location).length # 面との距離
            if distance < min_distance :
                min_distance = distance # 最小距離を更新
                nearest_face = face # BMFace
            #
        #
        if nearest_face != None: facesN.append(nearest_face)
        n-=1
    #
    #print(f'分割対象の面の数:{len(facesN)}')
    bpy.ops.mesh.select_all(action='DESELECT') # EDITモードにおいて全体を非選択へ
    for nearest_face in facesN: nearest_face.select=True
    bpy.context.view_layer.update()# データ更新を明示的に実行
    edges=[edge for edge in bm.edges if edge.select] # 細分化で使う面の辺群の取得
    print(f'分割対象の辺の数:{len(edges)}')
    try:
        result=bmesh.ops.subdivide_edges(bm, edges=edges, use_grid_fill=True, cuts=subdivisions)# 辺群で細分化
        bmesh.update_edit_mesh(obj.data) # BMeshを更新
    except Exception as e:
        print(f"エラーが発生しました: {e}")
    #
    bpy.ops.mesh.select_all(action='DESELECT') # EDITモードにおいて全体を非選択へ
    closest_vert = None
    min_distance = float('inf') # floatの最大値
    for vert in bm.verts: # BMVertの繰り返し
        distance = (vert.co - target_location).length #頂点との距離
        if distance < min_distance:
            min_distance = distance
            closest_vert  = vert
        #
    #
    if closest_vert != None:
        closest_vert.select=True
    bpy.ops.mesh.select_mode(use_extend=False, use_expand=False, type='VERT')
    bmesh.update_edit_mesh(obj.data) # BMeshを更新

# move_objを、objのローカル座標で移動する。
def set_location(move_obj,obj, local_location=(0,0,0) ):
    global_co = obj.matrix_world @ Vector(local_location)
    move_obj.location=global_co # 位置変更

# 引数のオブジェクトまたは編集モードの選択面に、マテリアルのRGBの色を設定する(マテリアルが存在しない場合は生成する)
def set_basecolor(obj, materialname='マテリアル', rgb=(0.0, 0.0, 0.0, 1.0)):
    idx=-1
    for i in range(len(obj.data.materials)):# 既存のマテリアル検索
        print(obj.data.materials[i].name)
        if obj.data.materials[i].name.startswith(materialname):
            idx = i
            break
    #
    if idx!=-1:
        material = obj.data.materials[idx]# マテリアル取得
        for node in material.node_tree.nodes:
            if node.type=='BSDF_PRINCIPLED':bsdf=node
            if node.type=='OUTPUT_MATERIAL':material_output=node
            print(f'ノード検索:{node}')
        #
    else:
        print(f'{materialname}の名前でマテリアルの生成')
        material = bpy.data.materials.new(materialname)# マテリアル生成
        obj.data.materials.append(material)  # マテリアルがない場合は追加
        material.use_nodes = True
        material.node_tree.nodes.clear()
        bsdf = material.node_tree.nodes.new(type='ShaderNodeBsdfPrincipled') # Bsdfノードを作成
        material_output = material.node_tree.nodes.new(type='ShaderNodeOutputMaterial')#シェーダーの最終出力を受け取るノード取得
        bsdf.location = (0, 0)
        material_output.location = (400, 0)
        # Principled BSDF ノードの BSDF 出力を、Material Output ノードの Surface 入力に接続
        material.node_tree.links.new(bsdf.outputs['BSDF'], material_output.inputs['Surface'])# ノード間をリンク
    #
    bsdf.inputs['Base Color'].default_value = rgb # Base Color を設定
    bpy.context.view_layer.update()# ビューポートを更新

# 3Dビューポートのエリアのシェーディングモード変更('WIREFRAME',  'SOLID',  'MATERIAL', 'RENDERED')する
def set_shading_mode(shading_type='MATERIAL'):
    for area in bpy.context.screen.areas:# 3Dビューポートのエリアを取得の繰り返し
        if area.type == 'VIEW_3D':  # 3Dビューエリアを探す
            for space in area.spaces: #スペースの探索
                if space.type == 'VIEW_3D':  # スペースのタイプが3Dビューであることを確認
                    space.shading.type = shading_type# シェーディングモードを'MATERIAL'に設定
                    print(f"シェーディングモードを {shading_type} に設定しました。")
                    return


def set_select_renage(obj, xmin=-sys.float_info.max, xmax=sys.float_info.max, ymin=-sys.float_info.max, ymax=sys.float_info.max, \
	zmin=-sys.float_info.max, zmax=sys.float_info.max, setSelect=True):
    if obj and obj.type != 'MESH': return
    mode = bpy.context.active_object.mode # 'EDIT'や'OBJECT'を記憶
    select_mode = bpy.context.tool_settings.mesh_select_mode # 編集対象のtype(選択モード)を記憶
    bpy.ops.mesh.select_mode(type='VERT', use_extend=True, use_expand=True)#頂点モード,現在のモードに追加,選択範囲を拡張
    #bpy.ops.mesh.select_mode(type='EDGE', use_extend=True, use_expand=True)#頂点モード,現在のモードに追加,選択範囲を拡張
    #bpy.ops.mesh.select_mode(type='FACE', use_extend=True, use_expand=True)#頂点モード,現在のモードに追加,選択範囲を拡張
    bm = bmesh.from_edit_mesh(obj.data)
    for i, vert in enumerate(bm.verts): # BMVertの繰り返しで、
        if vert.co.x >= xmin and vert.co.x <= xmax and vert.co.y >= ymin and vert.co.y <= ymax and vert.co.z >= zmin and vert.co.z <= zmax:
            vert.select=setSelect # 直方体で囲まれた頂点の選択状態を変更
    #
    if select_mode[1]: # 現在の選択モード: 辺 (EDGE)を含むか?
        #log_print('EDGE')
        for edge in bm.edges: # 選択されている頂点を持つエッジを選択
            if edge.verts[0].select and edge.verts[1].select:
                edge.select = setSelect
    #
    if select_mode[2]: # 現在の選択モード: 面 (FACE)を含むか?
        #log_print('FACE')
        for face in bm.faces:# 選択されている頂点を持つ面を選択
            if all(vert.select for vert in face.verts):
                face.select = setSelect
    #
    # 選択されている頂点を持つエッジを選択
    bmesh.update_edit_mesh(obj.data) # BMeshを更新して選択状態を反映
    bpy.context.tool_settings.mesh_select_mode = select_mode # 編集対象のtype(選択モード)を元の状態に復帰
    bpy.ops.object.mode_set(mode=mode) #

if __name__ == '__main__':
    '''編集モードの頂点選択モードで、座標を知りたい頂点だけを選択した状態で実行します。'''
    obj = bpy.context.active_object # 直前でアクセスしたオブジェクト
    lst=get_selected_vertex_indices(obj) # 選択中の頂点オブジェクトの添え字のリストを取得
    #logfile = open(r"D:\work\_debug.log","w")
    for i in lst:
        v:Vector = get_at(obj, i) # objのi番目の頂点座標取得
        print(v)
        #log_print(f"{v}\n")
    #
    #logfile.close()
(以下は、Pythonコンソールに貼り付けて、実行を確認しています。)
引数のobjの全ての頂点、辺、面を非選択するdeselect_all_elements関数の使用例
カメラとライト以外を削除した後、UV球を生成、deselect_all_elements関数を使った例です。(上記で示すbeditsub.pyの自作モジュールを利用しています)
# test.py
import sys
sys.path.append('D:\\work')
from importlib import reload
#import test
#reload( test )

import bpy
import bmesh
import beditsub # 自作モジュール

for obj in bpy.data.objects:# 'Camera' と 'Light' 以外を全て削除する
    if obj.name=='Camera' or obj.name=='Light': continue
    bpy.data.objects.remove( obj )

bpy.ops.mesh.primitive_uv_sphere_add(radius=1, location=(2, 0, 0), scale=(1, 1, 1))# 球 の生成
obj = bpy.context.active_object # 直前でアクセスしたオブジェクト

beditsub.deselect_all_elements(obj); # 編集モードにして全て非選択にする
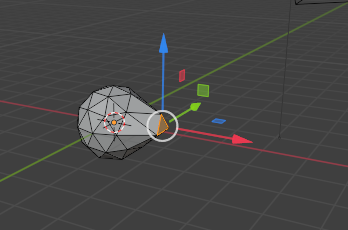
引数位置に最も近い面の添え字と、その距離を返す get_index_closest_face関数の使用例
カメラとライト以外を削除した後、ICO球を生成し、
(2, 0.0, 0.0)の位置に近い面を選択しています。その後で、その選択面をX方向の0.5だけ移動している。
(上記で示すbeditsub.pyの自作モジュールを利用しています)
# test.py
import sys
sys.path.append('D:\\work')
from importlib import reload
#import test
#reload( test )

import bpy
import bmesh
import mathutils
import beditsub # 自作モジュール

for obj in bpy.data.objects:# 'Camera' と 'Light' 以外を全て削除する
    if obj.name=='Camera' or obj.name=='Light': continue
    bpy.data.objects.remove( obj )


bpy.ops.mesh.primitive_ico_sphere_add(radius=1, location=(0, 0, 0), scale=(1, 1, 1))#ICO球を生成
obj = bpy.context.active_object # 直前でアクセスしたオブジェクト
beditsub.deselect_all_elements(obj); # 編集モードにして全て非選択にする

face_idx, _ =beditsub.get_index_closest_face(obj, mathutils.Vector((2.0, 0.0, 0.0)) ) # 近いの面を選択

bpy.ops.transform.translate(value=(0.5, 0, 0), orient_type='GLOBAL')# 選択面の移動(エディットモードで)
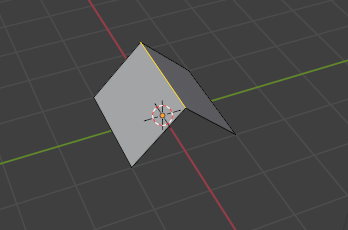
引数位置に最も近い辺の添え字と、その距離を返す get_index_closest_edge関数の使用例
カメラとライト以外を削除した後、平面を生成し、編集モードにして、引数の平面で切断する。その後、非選択にしてから(0.0, 0.0, 1.0)の位置に近い辺を求めて選択しています。
その後で、その選択辺をZ方向に1だけ移動している。
(上記で示すbeditsub.pyの自作モジュールを利用しています)
# test.py
import sys
sys.path.append('D:\\work')
from importlib import reload
#import test
#reload( test )

import bpy
import bmesh
import mathutils
import beditsub # 自作モジュール

for obj in bpy.data.objects:# 'Camera' と 'Light' 以外を全て削除する
    if obj.name=='Camera' or obj.name=='Light': continue
    bpy.data.objects.remove( obj )

bpy.ops.mesh.primitive_plane_add(size=2, location=(0, 0, 0), scale=(1, 1, 1)) # 平面生成

obj = bpy.context.active_object # 直前でアクセスしたオブジェクト

bpy.ops.object.mode_set(mode='EDIT')# 下記の編集オブジェクト取得のため編集モードにする

bpy.ops.mesh.bisect(# 引数の平面で、切断する
    plane_co=(0.0, 0.0, 0.0),  # カット平面の基準点
    plane_no=(0.0, 1.0, 0.0),  # カット平面の法線ベクトル
)

beditsub.deselect_all_elements(obj); # 編集モードにして全て非選択にする

edge_idx, _ =beditsub.get_index_closest_edge(obj, mathutils.Vector((0.0, 0.0, 2.0)) ) # 最も近いの辺を選択

bpy.ops.transform.translate(value=(0, 0, 1), orient_type='GLOBAL')# 選択(ここでは辺)の移動
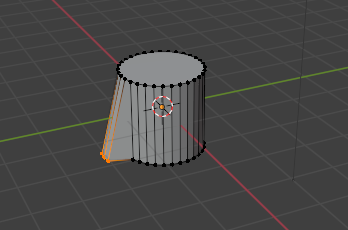
引数位置に最も近い頂点の添え字と、その距離を返す get_index_closest_vert関数の使用例
カメラとライト以外を削除した後、円柱を生成し、指定位置に近い頂点を3個選択しています。
その後、その3点を移動する例です。
(上記で示すbeditsub.pyの自作モジュールを利用しています)
# test.py
import sys
sys.path.append('D:\\work')
from importlib import reload
#import test
#reload( test )

import bpy
import bmesh
import mathutils
import beditsub # 自作モジュール

for obj in bpy.data.objects:# 'Camera' と 'Light' 以外を全て削除する
    if obj.name=='Camera' or obj.name=='Light': continue
    bpy.data.objects.remove( obj )

bpy.ops.mesh.primitive_cylinder_add(radius=1, depth=2, location=(0, 0, 0), scale=(1, 1, 1))
obj = bpy.context.active_object # 直前でアクセスしたオブジェクト

beditsub.deselect_all_elements(obj); # 編集モードにして全て非選択にする
bpy.ops.mesh.select_mode(use_extend=False, use_expand=False, type='VERT') # 頂点選択モード


target_location=mathutils.Vector((0.0, -2.0, -2.0)) # 目標の位置
exclude_idx=[]
vert_idx, _ =beditsub.get_index_closest_vert(obj, target_location ) # 目標の位置に最も近い頂点を選択
exclude_idx.append(vert_idx)
vert_idx, _ =beditsub.get_index_closest_vert(obj, target_location,exclude_idx) # 次に近いの頂点を選択
exclude_idx.append(vert_idx)
vert_idx, _ =beditsub.get_index_closest_vert(obj, target_location,exclude_idx) # 次に近いの頂点を選択
exclude_idx.append(vert_idx)
bpy.ops.transform.translate(value=(0, -0.5, 0))# 選択(ここでは頂点)の移動
頂点の添え字から、その頂点の位置を返す getVector(obj, vert_idx)関数の使用例
カメラとライト以外を削除した後、円を生成し、指定位置(0.0, 2.0, 2.0)に最も近い頂点の添え字を取得後、その添え字の頂点の座標を表示し、移動している例
(上記で示すbeditsub.pyの自作モジュールを利用しています)
import sys
sys.path.append('D:\\work')
from importlib import reload
#import test
#reload( test )

import bpy
import bmesh
import mathutils
import beditsub # 自作モジュール

for obj in bpy.data.objects:# 'Camera' と 'Light' 以外を全て削除する
    if obj.name=='Camera' or obj.name=='Light': continue
    bpy.data.objects.remove( obj )

bpy.ops.mesh.primitive_circle_add(location=(0, 0, 0), scale=(1, 1, 1))
obj = bpy.context.active_object # 直前でアクセスしたオブジェクト

beditsub.deselect_all_elements(obj); # 編集モードにして全て非選択にする
target_location=mathutils.Vector((0.0, 2.0, 2.0)) # 目標の位置
vert_idx, _ =beditsub.get_index_closest_vert(obj, target_location ) # 目標の位置に最も近い頂点を選択

target_location=beditsub.getVector(obj, vert_idx) # 引数の頂点の座標(x,y,zのVector)を取得
print( target_location )
bpy.ops.transform.translate(value=(0.0, 0.5, 0.0))# 選択(ここでは頂点)の移動
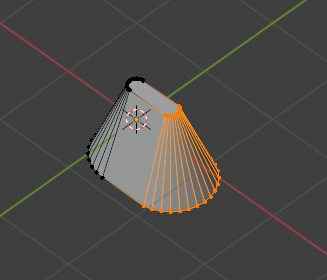
set_select_renage関数の使用例
円錐の一部をset_select_renageで選択して移動する例(上記で示すbeditsub.pyの自作モジュールを利用しています)
import sys
sys.path.append('D:\\work')
from importlib import reload
#import test
#reload( test )

import bpy
import bmesh
import mathutils
import beditsub # 自作モジュール

for obj in bpy.data.objects:# 'Camera' と 'Light' 以外を全て削除する
    if obj.name=='Camera' or obj.name=='Light': continue
    bpy.data.objects.remove( obj )

bpy.ops.mesh.primitive_cone_add(radius1=0.5, radius2=0.1, depth=2,  location=(0, 0, 0), scale=(1, 1, 0.5))# 立方体作成
obj = bpy.context.active_object # 直前でアクセスしたオブジェクト
beditsub.deselect_all_elements(obj); # 編集モードにして全て非選択にする
beditsub.set_select_renage(obj, xmin=0.01,setSelect=True)
bpy.ops.transform.translate(value=( 0.5, 0, 0))# 選択(ここでは頂点)の移動
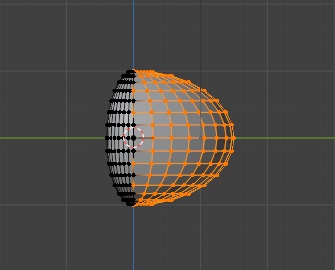
move_parallel_y関数の使用例
uv_sphere(U軸,V軸 展開の球)の左半分を選択し、それをY軸で縮めます。次に右半分を選択し直して、それを伸ばす例
(上記で示すbeditsub.pyの自作モジュールを利用しています)
import sys
sys.path.append('D:\\work')
import bpy
import bmesh
import mathutils
import beditsub # 自作モジュール

for obj in bpy.data.objects:# 'Camera' と 'Light' 以外を全て削除する
    if obj.name=='Camera' or obj.name=='Light': continue
    bpy.data.objects.remove( obj )

bpy.ops.mesh.primitive_uv_sphere_add(radius=1, segments=32, ring_count=16, location=(0, 0, 0))# UV球作成
obj = bpy.context.active_object # 直前でアクセスしたオブジェクト
beditsub.deselect_all_elements(obj); # 編集モードにして全て非選択にする
beditsub.set_select_renage(obj, ymax=0,setSelect=True) # 左半分の選択
# func = lambda x,param : (x)*param
beditsub.move_parallel_y(obj, param=0.6, base_Y=0) # 選択部分を base_Y=0に近づけて、縮むような処理

beditsub.deselect_all_elements(obj); # 編集モードにして全て非選択にする
beditsub.set_select_renage(obj, ymin=0,setSelect=True) # 右半分の選択
y=2
func = lambda x,param : (x-y)*-param # 伸ばすための関数定義
beditsub.move_parallel_y(obj, param=0.5, base_Y=y, func=func) # 選択部分を base_Y=2に近づけて、伸ばすような処理
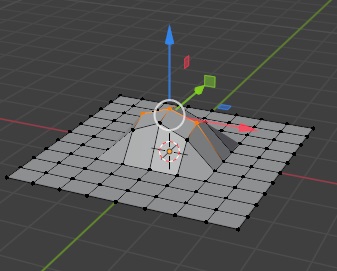
get_selected_vertex_indices、select_vertices_by_indicesの利用例
グリッド生成してその中心の頂点を選択後、その頂点の添え字リストを取得しています。次にその頂点をプロポーショナル編集でZ軸方向に移動ししています。
そして、頂点の添え字の前後を含めたリストから、それら頂点を選択状態にしています。
(上記で示すbeditsub.pyの自作モジュールを利用しています)
import sys
sys.path.append('D:\\work')
import bpy
import bmesh
import mathutils
import beditsub # D:\workの自作モジュール

for obj in bpy.data.objects:# 'Camera' と 'Light' 以外を全て削除する
    if obj.name=='Camera' or obj.name=='Light': continue
    bpy.data.objects.remove( obj )

# X方向に8分割、Y方向に10分割のグリッドを作成
bpy.ops.mesh.primitive_grid_add(x_subdivisions=8, y_subdivisions=10, size=5, location=(0, 0, 0))
obj = bpy.context.active_object # 直前でアクセスしたオブジェクト
beditsub.deselect_all_elements(obj) # 非選択へ
beditsub.get_index_closest_vert(obj, mathutils.Vector((0, 0, 0.1)),  exclude_idx  ) # (0, 0, 0.1)に近い頂点の選択

lst=beditsub.get_selected_vertex_indices(obj)# 選択状態の頂点リストを得る

# プロポーショナルサイズを2.0に設定
bpy.context.scene.tool_settings.proportional_size = 1.0

# プロポーショナル編集を有効にし、Z軸方向に1ユニット移動
bpy.ops.transform.translate(value=(0, 0, 1), constraint_axis=(False, False, False), use_proportional_edit=True, proportional_edit_falloff='SPHERE')
#proportional_edit_falloff='SMOOTH'がデフォルトの滑らかな減衰で、'LINEAR': 線形の減衰、'SPHERICAL': 球状の減衰、'SHARP': 急激な減衰、 'CONSTANT', 'RANDOM'
idx= lst[0]
lst = [idx-1, idx , idx+1]

beditsub.select_vertices_by_indices(obj, lst) # 添え字のリストで選択
beditsubのcreate_bar, set_basecolor, deselect_all_elements, set_select_renage, set_shading_modeの利用例
(上記で示すbeditsub.pyの自作モジュールを利用しています)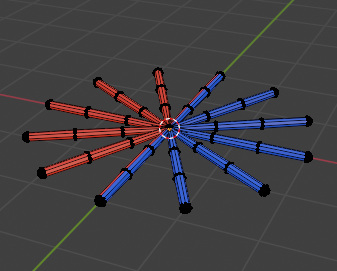 create_barで棒を回転して生成する繰り返しをした後、それら全てを結合した後、全トランスフォームの適用をしています。
次に、set_basecolorで'赤'のマテリアルを設定しています。
その後、辺選択状態にして、set_select_renageで半分の面を選択状態にしています。
そして、'青'のマテリアルを追加して、選択した面の半分にこのマテリアルに割り当てています。
import sys
sys.path.append('D:\\work')
import bpy
import bmesh
import mathutils
import beditsub # D:\workの自作モジュール
import math

for obj in bpy.data.objects:# 'Camera' と 'Light' 以外を全て削除する
    if obj.name=='Camera' or obj.name=='Light': continue
    bpy.data.objects.remove( obj )

xys=[(math.cos(math.radians(d))*2,math.sin(math.radians(d))*2) for d in range(0,360,30)]
for xy in xys:
    print(xy[0])
    start=Vector((xy[0], xy[1], 0))
    end=Vector((0,0, 0))
    name=str(start)
    beditsub.create_bar(start, end, name, radius=0.06, vertices=8, ratios=[1.1, 0.9, 0.7]) # 膨らみがある棒の生成

bpy.ops.object.select_all(action='SELECT') # 全て選択
bpy.ops.object.join() # 結合 (作成した各棒はローカル座標で結合。適合しないと、生成した棒は個別座標で管理されて状態のまま)
obj = bpy.context.active_object # 直前でアクセスしたオブジェクト
bpy.ops.object.transform_apply(location=True, rotation=True, scale=True) # 適用(これで、生成した棒は統一座標で管理されて状態に変換)
beditsub.set_basecolor( obj, materialname='赤', rgb=(1.0, 0.0, 0.0, 1.0) ) #
beditsub.deselect_all_elements(obj)
bpy.ops.object.mode_set(mode='EDIT') # Editモード
bpy.ops.mesh.select_mode(type='FACE', use_extend=False, use_expand=False)# 面選択モードへ,選択モードを置き換え, 選択範囲をリセット
beditsub.set_select_renage(obj, xmin=-0.04, setSelect=True)
bmesh.update_edit_mesh(obj.data) # BMeshを更新して選択状態を反映
beditsub.set_basecolor( obj, materialname='青', rgb=(0.0, 0.0, 1.0, 0.5) ) # 青マテリアル作成
bpy.context.object.active_material_index = 1 # 現在のマテリアルを1の指定にする
bpy.ops.object.material_slot_assign()# 現在の選択面に選択のマテリアルを割り当て
beditsub.set_shading_mode( 'MATERIAL' )# シェーディングモードを'MATERIAL'に設定