人型モデルをスクリプトで実現する試みの実験 02
Blender初心者が最初に覚えるべき内容をまとめたページは、このリンクにあります。
このページは、Blender(Portable_4.1.1)のPythonスクリプトで
ライブラリ(beditsub.pyを利用してスクリプトで人型モデリングを試みた実験の記録です。
(以前のpage:01)
なお、
「リギング:Rigify」のアドオン時に使える「アーマチュア」の「Human (Meta-Rig)」を利用しています。
この「Human (Meta-Rig)」の周りに肉体のメッシュを追加する試みた内容です。
なお「リギング:Rigify」のアドオンは、「編集」メニューの「プリファレンス」より、「アドオン」を選択して「rig」の検索し、
「リギング:Rigify」にチェックを入れます。
これでオブジェクトモードで「追加」メニューの「アーマチュア」の「Human (Meta-Rig)」のメニュー項目が選択できる状態であれば、以下のスクリプトが実行できます。
アーマチュアの周りに基本となるボディ部の元となるメッシュを追加する
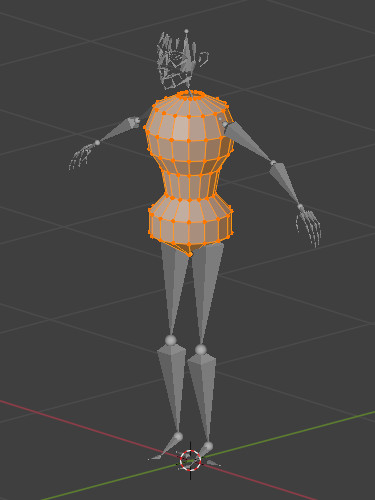
次のスクリプトで、右記のイメージで示すオブジェクト生成します。
次のようなことを行っています。
- 'Camera' と 'Light' 以外を全て削除
- 「アーマチュア」の「Human (Meta-Rig)」追加
- ボディ部の底となる円を、骨に合わせて生成
- 円を上へ押し出して、サイズを変更する
この、円を上へ押し出して、サイズを変更すること、8回行っている。 - 頂点選択モードにして、全ての頂点を選択
(beditsub.pyが、同一ディレクトリ'D:\\work'に必要)
import sys
sys.path.append('D:\\work')
from importlib import reload
#import test
#reload( test )

import bpy
import bmesh
import mathutils
import beditsub # 自作モジュール

bpy.ops.object.mode_set(mode='OBJECT')# オブジェクトモードに切り替え

for obj in bpy.data.objects:# 'Camera' と 'Light' 以外を全て削除する
    if obj.name=='Camera' or obj.name=='Light': continue
    bpy.data.objects.remove( obj )

# 「リギング:Rigify」アドオン時に使える「アーマチュア」の「Human (Meta-Rig)」追加
bpy.ops.object.armature_human_metarig_add()

#ボディの編集
z=0.95#高さ
bpy.ops.mesh.primitive_circle_add(location=(0, 0, z), scale=(1, 1, 1), vertices=16,radius=0.01)#円の追加
obj = bpy.context.active_object # 直前でアクセスしたオブジェク
obj.name = "body" # 名前を付ける
bpy.ops.object.mode_set(mode='EDIT')# オブジェクトモードに切り替え
bpy.ops.mesh.extrude_context_move(TRANSFORM_OT_translate={"value": (0, 0, 0.1)})# 押し出し処理
bpy.ops.transform.resize(value=(18, 18, 1))# サイズ変更処理
bpy.ops.mesh.extrude_context_move(TRANSFORM_OT_translate={"value": (0, 0, 0.1)})# 押し出し処理
bpy.ops.mesh.extrude_context_move(TRANSFORM_OT_translate={"value": (0, 0, 0.08)})# 押し出し処理
bpy.ops.transform.resize(value=(0.6, 0.6, 1))# サイズ変更処理(0.6倍に)
bpy.ops.mesh.extrude_context_move(TRANSFORM_OT_translate={"value": (0, 0, 0.12)})# 押し出し処理
bpy.ops.transform.resize(value=(1.2, 1.2, 1))# サイズ変更処理
bpy.ops.mesh.extrude_context_move(TRANSFORM_OT_translate={"value": (0, 0, 0.08)})# 押し出し処理
bpy.ops.transform.resize(value=(1.4, 1.4, 1))# サイズ変更処理
bpy.ops.mesh.extrude_context_move(TRANSFORM_OT_translate={"value": (0, 0, 0.1)})# 押し出し処理
bpy.ops.transform.resize(value=(1.1, 1.1, 1))# サイズ変更処理
bpy.ops.mesh.extrude_context_move(TRANSFORM_OT_translate={"value": (0, 0, 0.1)})# 押し出し処理
bpy.ops.transform.resize(value=(0.8, 0.8, 1))# サイズ変更処理
bpy.ops.mesh.extrude_context_move(TRANSFORM_OT_translate={"value": (0, 0, 0.05)})# 押し出し処理
bpy.ops.transform.resize(value=(0.35, 0.35, 1))# サイズ変更処理

bpy.ops.mesh.select_mode(use_extend=False, use_expand=False, type='VERT') # 頂点選択モード

bpy.ops.mesh.select_all(action='SELECT') # 全て選択
膨らんでいるボディを、部分的に痩せさせる
部分的に移動対象の頂点を選択し、その頂点の移動で痩せさせます。部分的に頂点を移動させるため、移動する頂点を選択します
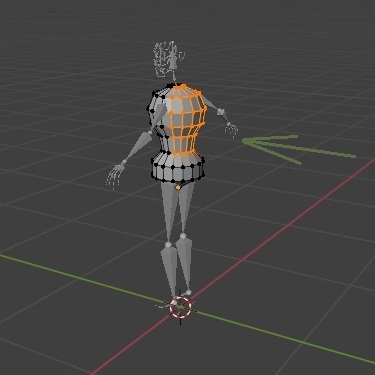
引数で示す直方体の範囲内にある頂点を選択するための set_select_renage関数を作り、 自作ライブラリ(beditsub.py)に追加して、 それを利用します。
次のコードは上記の続きで、おしりを除いた背中の後ろの部分を選択しています。
この実行結果は、右のイメージです。
beditsub.deselect_all_elements(obj) # objの内部を全て非選択にする。

beditsub.set_select_renage(obj,ymin=0.01) # ボディの後側頂点選択
# yが0.01以上の位置にある頂点を選択状態にする

beditsub.set_select_renage(obj,zmax=0.21, setSelect=False)# お尻を選択状態から外す。
# zが0.21以下の位置にある頂点を、非選択状態にする
次にこの選択状態の頂点を、緑の矢印方向に、痩せるように移動する。
それが次のステップです。
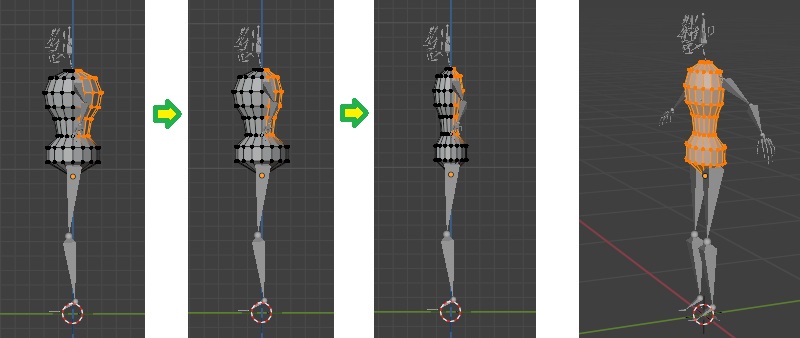
頂点を痩せるように移動させる
引数objの頂点群を、y軸方向で平行移動させるmove_parallel_y関数を、 自作ライブラリ(beditsub.py)に追加して、 それを利用します。この関数の移動量は、各頂点とbase_Y座標との距離に対して、paramを使った引数の関数で決まります。
デフォルトの関数であれば、「距離×比率のparam」だけ移動します。
これはy方向に潰したり、膨らませた形状へ変更する場合に使います。
次のコードは上記の続きで、おしりを除いた背中の後ろの部分を選択してから使います。
# (お尻以外の背中の頂点だけが選択状態で、実行する。)
beditsub.move_parallel_y(obj,param=0.3,selected=True) # 選択域のお尻以外の背中を?せさせる(Y軸の幅を、0.3倍に減らす)
beditsub.move_parallel_y(obj,param=0.4,selected=False) # ボディ全体を痩せさせる(Y軸の幅を0.4倍に減らす)

bpy.ops.mesh.select_all(action='SELECT') # 全て選択
この実行のイメージが下記の通りで、デフォルト引数base_Y=0の位置の方向に、選択状態の頂点を移動し、
その後に全頂点を、base_Y=0の位置の方向に移動することで、痩せた体形に変更しています。
ボディ部生成スクリプト(create_body.py)
上記で紹介したコードを利用して作成したコード
import sys
DRV='D' # windows system ドライブ名
libpath=f'{DRV}:\\work' # 追加モジュールパス
if not (libpath in sys.path): sys.path.append(libpath)
#
from importlib import reload
import bpy
import bmesh
import mathutils
import beditsub # 自作モジュール
#reload( beditsub )

def add_object():
    #ボディの編集-------------------------------------------------------------------------------------------------
    bpy.ops.mesh.primitive_circle_add(location=(0, 0, 0.95), scale=(1, 1, 1), vertices=16,radius=0.01)#円の追加
    obj = bpy.context.active_object # 直前でアクセスしたオブジェク
    obj.name = "body" # 名前を付ける
    bpy.ops.object.mode_set(mode='EDIT')# 編集モードに切り替え
    bpy.ops.mesh.select_mode(use_extend=False, use_expand=False, type='EDGE') # 辺選択モード
    #
    bpy.ops.mesh.extrude_context_move(TRANSFORM_OT_translate={"value": (0, 0, 0.1)})# 押し出し処理
    bpy.ops.transform.resize(value=(18, 18, 1))# サイズ変更処理(お尻下)
    bpy.ops.mesh.extrude_context_move(TRANSFORM_OT_translate={"value": (0, 0, 0.1)})# 押し出し処理
    bpy.ops.transform.resize(value=(1, 1, 1))# サイズ変更処理(お尻上)
    #
    bpy.ops.mesh.extrude_context_move(TRANSFORM_OT_translate={"value": (0, 0, 0.08)})# 押し出し処理
    bpy.ops.transform.resize(value=(0.6, 0.6, 1))# サイズ変更処理(0.6倍に)(腰の始まり)
    waist_indices=beditsub.get_selected_vertex_indices(obj) # 選択状態の頂点の添え字群リスト取得(腰の情報)
    #
    bpy.ops.mesh.extrude_context_move(TRANSFORM_OT_translate={"value": (0, 0, 0.12)})# 押し出し処理
    bpy.ops.transform.resize(value=(1.2, 1.2, 1))# サイズ変更処理(肺の下のライン)
    #
    bpy.ops.mesh.extrude_context_move(TRANSFORM_OT_translate={"value": (0, 0, 0.08)})# 押し出し処理
    bpy.ops.transform.resize(value=(1.4, 1.4, 1))# サイズ変更処理
    bpy.ops.mesh.extrude_context_move(TRANSFORM_OT_translate={"value": (0, 0, 0.1)})# 押し出し処理
    bpy.ops.transform.resize(value=(1.1, 1.1, 1))# サイズ変更処理(脇の下のライン)
    #
    bpy.ops.mesh.extrude_context_move(TRANSFORM_OT_translate={"value": (0, 0, 0.05)})# 押し出し処理
    bpy.ops.transform.resize(value=(1, 1, 1))# サイズ変更処理(腕の付け根のライン)
    #
    bpy.ops.mesh.extrude_context_move(TRANSFORM_OT_translate={"value": (0, 0, 0.07)})# 押し出し処理
    bpy.ops.transform.resize(value=(0.8, 0.8, 1))# サイズ変更処理(肩のライン)
    bpy.ops.mesh.extrude_context_move(TRANSFORM_OT_translate={"value": (0, 0, 0.035)})# 押し出し処理
    bpy.ops.transform.resize(value=(0.3, 0.3, 1))# サイズ変更処理(首の付け根のライン)
    #
    neck_indices=beditsub.get_selected_vertex_indices(obj) # 選択状態の頂点の添え字群リスト取得(首の情報)
    bpy.ops.mesh.extrude_context_move(TRANSFORM_OT_translate={"value": (0, 0, 0.1)})# 押し出し処理
    bpy.ops.transform.translate(value=(0, -0.03, 0))# 選択(ここでは頂点)の移動
    #
    # ここからボディの変形(奥行を縮める)
    bpy.ops.mesh.select_mode(use_extend=False, use_expand=False, type='VERT') # 頂点選択モード
    beditsub.deselect_all_elements(obj) # objの内部を全て非選択にする。
    waist_z=beditsub.get_at(obj, waist_indices[0]).z # 腰位置z取得get_selected_vertex_indices
    neck_z =beditsub.get_at(obj, neck_indices[0]).z  # 首位置z取得
    beditsub.set_select_renage(obj, ymin=0.01, zmin=waist_z-0.001, zmax=neck_z-0.001) # ボディの後側頂点選択
    #
    beditsub.move_parallel_y(obj,param=0.3,selected=True) # 選択域のお尻以外の背中を?せさせる(Y軸の幅を、0.3倍に減らす)
    beditsub.set_select_renage(obj, zmax=neck_z-0.001) # ボディの後側頂点選択
    beditsub.move_parallel_y(obj,param=0.4,selected=True) # ボディ全体を痩せさせる(Y軸の幅を0.4倍に減らす)
    #
    return obj

if __name__ == '__main__': # オブジェクトモードで、実行させる必要があります
    for obj in bpy.data.objects:# 'Camera' と 'Light' 以外を全て削除する
        if obj.name=='Camera' or obj.name=='Light': continue
        bpy.data.objects.remove( obj )
    # 「リギング:Rigify」アドオン時に使える「アーマチュア」の「Human (Meta-Rig)」追加
    bpy.ops.object.armature_human_metarig_add()
    armature = bpy.context.active_object # 直前で生成したアーマチュアオブジェクト
    add_object()
顔、頭 の生成スクリプト(create_face.py)
上記で紹介したコードを利用して作成したコード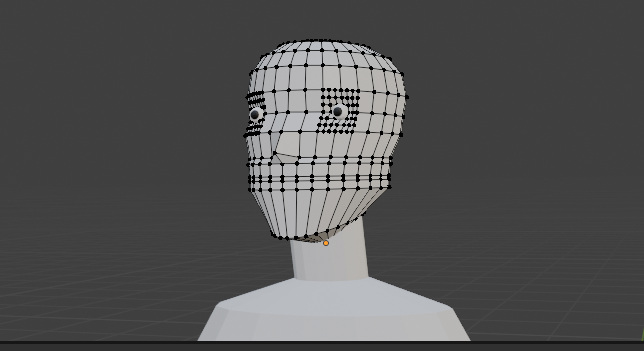
import math
import sys
DRV='D' # windows system ドライブ名
libpath=f'{DRV}:\\work' # 追加モジュールパス
if not (libpath in sys.path): sys.path.append(libpath)
#
from importlib import reload
import bpy
import bmesh
import mathutils
from mathutils import Vector
import beditsub # 自作モジュール
#reload( beditsub )

def create_eye(radius=0.01,segments=16,ring_count=10):
    bpy.ops.object.mode_set(mode='OBJECT')
    bpy.ops.object.select_all(action='DESELECT')
    bpy.ops.mesh.primitive_uv_sphere_add(segments=segments, ring_count=ring_count, radius=radius)
    eyeObj=bpy.context.active_object # 直前でアクセスしたオブジェク
    beditsub.set_basecolor(eyeObj, rgb=(0.0, 0.0, 0.0, 1.0), materialname='マテリアル.黒')
    beditsub.set_basecolor(eyeObj, rgb=(1.0, 1.0, 1.0, 1.0), materialname='マテリアル.白')
    bpy.ops.object.mode_set(mode='EDIT')
    bm = bmesh.from_edit_mesh(eyeObj.data) # 編集モード中のメッシュデータをBMeshに変換
    for face in bm.faces: # 全ての面の走査
        if face.calc_center_median().z < radius*0.8: face.select=True
        else: face.select=False
    #
    bmesh.update_edit_mesh(eyeObj.data) # BMeshを更新(編集モードで、bmは引き続き編集可能)
    bpy.context.object.active_material_index = 1 # 現在のマテリアルを1の指定('マテリアル.白')にする
    bpy.ops.object.material_slot_assign()# 現在の選択面に選択のマテリアルを割り当て
    bpy.ops.object.mode_set(mode='OBJECT')
    bpy.ops.transform.rotate(value=-1.5708, orient_axis='X') # X軸で、-90度を回転
    bpy.ops.object.transform_apply(location=True, rotation=True, scale=True) # 全トランスフォーム適用
    return eyeObj

def add_object():
    # 顔の輪郭メッシュ生成------------------------------------------------------------------------------------------------
    if bpy.context.mode != 'OBJECT': bpy.ops.object.mode_set(mode='OBJECT')# オブジェクトモードに切り替え
    #
    bpy.ops.mesh.primitive_circle_add(location=(0, -0.02, 1.73), scale=(1, 1, 1), vertices=32,radius=0.01)#円の追加
    obj = bpy.context.active_object # 直前でアクセスしたオブジェク
    obj.name = "head" # 名前を付ける
    bpy.ops.object.mode_set(mode='EDIT')# 編集モードに切り替え
    bpy.ops.mesh.select_mode(use_extend=False, use_expand=False, type='EDGE') # 辺選択モード
    bpy.ops.mesh.extrude_context_move(TRANSFORM_OT_translate={"value": (0, 0, 0.02)})# 押し出し処理
    bpy.ops.transform.resize(value=(5, 13, 0))# サイズ変更処理 (顎の先のライン)
    jaw_indices=beditsub.get_selected_edges_indices(obj) # 選択状態の辺の添え字群リスト取得(顎の辺ラインの情報)
    #
    bpy.ops.mesh.extrude_context_move(TRANSFORM_OT_translate={"value": (0, 0, 0.05)})# 押し出し処理
    bpy.ops.transform.resize(value=(1.7, 1.1, 0))# サイズ変更処理(口の下のライン)
    #
    bpy.ops.mesh.extrude_context_move(TRANSFORM_OT_translate={"value": (0, 0, 0.01)})# 押し出し処理
    bpy.ops.transform.resize(value=(1, 1, 0))# サイズ変更処理(口のライン)
    #
    bpy.ops.mesh.extrude_context_move(TRANSFORM_OT_translate={"value": (0, 0, 0.005)})# 押し出し処理
    bpy.ops.transform.resize(value=(1, 1, 0))# サイズ変更処理(口の上のライン)
    #
    bpy.ops.mesh.extrude_context_move(TRANSFORM_OT_translate={"value": (0, 0, 0.015)})# 押し出し処理
    bpy.ops.transform.resize(value=(1.03, 1, 0))# サイズ変更処理(鼻下のライン)
    #
    bpy.ops.mesh.extrude_context_move(TRANSFORM_OT_translate={"value": (0, 0, 0.007)})# 押し出し処理
    #bpy.ops.transform.resize(value=(1, 1, 0))# サイズ変更処理(鼻の頂点ライン)
    bpy.ops.transform.resize(value=(1, 0.95, 0))# サイズ変更処理(鼻の頂点ライン)
    # 上記の頂点群記憶
    nose_indices=beditsub.get_selected_edges_indices(obj) # 選択状態の辺の添え字群リスト取得(鼻の辺ラインの情報)
    bpy.ops.mesh.select_mode(use_extend=False, use_expand=False, type='VERT') # 頂点選択モード
    beditsub.deselect_all_elements(obj) # objの内部を全て非選択にする。
    beditsub.set_select_renage(obj, ymin=0.01) # 頭の後側頂点選択
    beditsub.move_parallel_y(obj,param=0.6,selected=True) # 頭の下部を縮める(Y軸の幅を0.5倍に減らす)
    beditsub.deselect_all_elements(obj) # objの内部を全て非選択にする。
    #
    beditsub.select_edges_by_indices(obj, jaw_indices) # 顎の頂点ラインの選択復元
    bpy.ops.transform.rotate(value=math.radians(-10), orient_axis='X') # 回転
    bpy.ops.transform.translate(value=(0, 0, 0.01))# 選択(ここでは頂点)の移動
    #
    beditsub.deselect_all_elements(obj) # objの内部を全て非選択にする。
    beditsub.select_edges_by_indices(obj, nose_indices) # 鼻の辺のラインの選択復元
    #
    bpy.ops.mesh.extrude_context_move(TRANSFORM_OT_translate={"value": (0, 0, 0.030)})# 押し出し処理
    bpy.ops.transform.resize(value=(1.12, 1.12, 0))# サイズ変更処理(耳のライン)
    bpy.ops.transform.translate(value=(0, 0.009, 0))# 選択の移動
    #
    bpy.ops.mesh.extrude_context_move(TRANSFORM_OT_translate={"value": (0, 0, 0.024)})# 押し出し処理
    #bpy.ops.transform.resize(value=(0.95, 1.02, 0))# サイズ変更処理(目のライン)
    #bpy.ops.transform.translate(value=(0, 0.005, 0))# 選択の移動
    bpy.ops.transform.resize(value=(1.0, 0.95, 0))# サイズ変更処理(目のライン)# ★
    bpy.ops.transform.translate(value=(0, 0.015, 0))# 選択の移動
    #
    #bpy.ops.mesh.extrude_context_move(TRANSFORM_OT_translate={"value": (0, 0, 0.026)})# 押し出し処理
    #bpy.ops.transform.resize(value=(1, 1, 0))# サイズ変更処理(眉毛のライン)
    bpy.ops.mesh.extrude_context_move(TRANSFORM_OT_translate={"value": (0, 0, 0.026)})# 押し出し処理
    bpy.ops.transform.resize(value=(1.05, 1.06, 0))# サイズ変更処理(眉毛のライン)
    bpy.ops.transform.translate(value=(0, 0.000, 0))# 選択の移動 # ★
    #
    bpy.ops.mesh.extrude_context_move(TRANSFORM_OT_translate={"value": (0, 0, 0.03)})# 押し出し処理
    bpy.ops.transform.resize(value=(0.95, 0.95, 0))# サイズ変更処理(頭下のライン)
    #
    bpy.ops.mesh.extrude_context_move(TRANSFORM_OT_translate={"value": (0, 0, 0.02)})# 押し出し処理
    bpy.ops.transform.resize(value=(0.85, 0.85, 0))# サイズ変更処理(頭中下のライン)
    #
    bpy.ops.mesh.extrude_context_move(TRANSFORM_OT_translate={"value": (0, 0, 0.015)})# 押し出し処理
    bpy.ops.transform.resize(value=(0.7, 0.7, 0))# サイズ変更処理(頭中のライン)
    #
    bpy.ops.mesh.extrude_context_move(TRANSFORM_OT_translate={"value": (0, 0, 0.005)})# 押し出し処理
    bpy.ops.transform.resize(value=(0.5, 0.5, 0))# サイズ変更処理(頭上のライン)
    #
    bpy.ops.mesh.edge_face_add() # 頭てっぺんの面を生成
    beditsub.deselect_all_elements(obj) # objの内部を全て非選択にする。
    #
    # 鼻の近辺を引っ張る調整
    target_location=mathutils.Vector((0.0, -0.135, 0.1)) # 目標の位置
    vert_idx, _ =beditsub.get_index_closest_vert(obj, target_location ) # 目標の位置に最も近い頂点を選択
    bpy.ops.transform.translate(value=(0, -0.03, 0.005))# 選択(ここでは頂点)の移動(鼻の天辺の引っ張り)
    bpy.ops.mesh.select_all(action='DESELECT') # 非選択
    vert_idx, _ =beditsub.get_index_closest_vert(obj, mathutils.Vector((0, -0.14, 0.14)) ) # 目標の位置に最も近い頂点を選択
    bpy.ops.transform.translate(value=(0, -0.008, 0))# 選択(ここでは頂点)の移動
    bpy.ops.mesh.select_all(action='DESELECT') # 非選択
    vert_idx, _ =beditsub.get_index_closest_vert(obj, mathutils.Vector((0, -0.13, 0.16)) ) # 目標の位置に最も近い頂点を選択
    bpy.ops.transform.translate(value=(0, -0.008, 0))# 選択(ここでは頂点)の移動
    #
    # 眼の窪みを作る
    bpy.context.scene.tool_settings.proportional_size = 0.02 # プロポーショナル編集の大きさ
    eyeR=(0.0541, -0.0940, 0.161)
    beditsub.split_nearest_faceN(obj, location=eyeR, subdivisions=2, n=4) # 面の分割で追加
    bpy.ops.transform.translate(value=(0,0.01, 0), constraint_axis=(False, False, False), use_proportional_edit=True, proportional_edit_falloff='SPHERE')
    eyeL=(-eyeR[0], eyeR[1], eyeR[2])
    beditsub.split_nearest_faceN(obj, location=eyeL, subdivisions=2, n=4) # 面の分割で追加
    bpy.ops.transform.translate(value=(0,0.01, 0), constraint_axis=(False, False, False), use_proportional_edit=True, proportional_edit_falloff='SPHERE')
    #
    bpy.context.view_layer.update() # 操作の完了を明示的に待つ
    #
    radius=0.01 # UV球半径
    segments=16 # UV球の縦分割
    ring_count=10 # UV球の角度分割
    eyeObj=create_eye(radius=radius,segments=segments,ring_count=ring_count)
    beditsub.set_location(eyeObj, obj, local_location=eyeR )
    eyeObj=create_eye(radius=radius,segments=segments,ring_count=ring_count)
    beditsub.set_location(eyeObj, obj, local_location=eyeL )
    #
    return obj

if __name__ == '__main__': # オブジェクトモードで、実行させる必要があります
    for obj in bpy.data.objects:# 'Camera' と 'Light' 以外を全て削除する
        if obj.name=='Camera' or obj.name=='Light': continue
        bpy.data.objects.remove( obj )
    # 「リギング:Rigify」アドオン時に使える「アーマチュア」の「Human (Meta-Rig)」追加
    bpy.ops.object.armature_human_metarig_add()
    armature = bpy.context.active_object # 直前で生成したアーマチュアオブジェクト
    import create_body
    create_body.add_object()
    add_object() # 顔の生成
ボディ、頭に 手足を追加 の生成スクリプト(create_main.py)
上記で紹介したコードを利用して作成したコード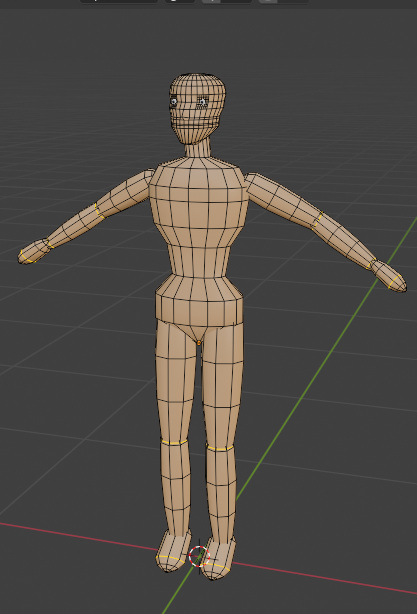
import sys
DRV='D' # windows system ドライブ名
libpath=f'{DRV}:\\work' # 追加モジュールパス
if not (libpath in sys.path): sys.path.append(libpath)
#
from importlib import reload
import math
import bpy
import bmesh
import mathutils
import beditsub # 自作モジュール
import create_body
import create_face
#reload( beditsub )
#beditsub.logfile=open(f'{DRV}:\\work\\log.txt',"w")

area = next(area for area in bpy.context.screen.areas if area.type == 'VIEW_3D')
region = area.spaces.active.region_3d
region.view_location = mathutils.Vector((0.0, 0.0, 1.8))# 視点の位置を移動(x, y, z の座標を指定)
region.view_rotation = mathutils.Euler((math.radians(90), 0.0, 0.0)).to_quaternion()# 視点の回転をリセット(例えば、正面に設定)

bpy.context.scene.cursor.location = (0.0, 0.0, 0.0)#3DカーソルをBlenderで原点(0, 0, 0)に移動させる

bpy.ops.object.mode_set(mode='OBJECT')# オブジェクトモードに切り替え

for obj in bpy.data.objects:# 'Camera' と 'Light' 以外を全て削除する
    if obj.name=='Camera' or obj.name=='Light': continue
    bpy.data.objects.remove( obj )

# 「リギング:Rigify」アドオン時に使える「アーマチュア」の「Human (Meta-Rig)」追加
bpy.ops.object.armature_human_metarig_add()
armature = bpy.context.active_object # 直前で生成したアーマチュアオブジェクト

obj_body=create_body.add_object() # ボディの生成

obj_face=create_face.add_object() # 頭、顔の生成

upper_arm_L=beditsub.adding_flesh_to_bone(armature, "upper_arm.L", radius=0.05, vertices=8, ratios=[1.1, 0.9, 0.8])#腕の生成
upper_arm_R=beditsub.adding_flesh_to_bone(armature, "upper_arm.R", radius=0.05, vertices=8, ratios=[1.1, 0.9, 0.8])

forearm_L=beditsub.adding_flesh_to_bone(armature, "forearm.L", radius=0.04, vertices=8, ratios=[1.1, 0.9, 0.7])#前腕の生成
forearm_R=beditsub.adding_flesh_to_bone(armature, "forearm.R", radius=0.04, vertices=8, ratios=[1.1, 0.9, 0.7])

palm_02_L=beditsub.adding_flesh_to_bone(armature, "palm.02.L", radius=0.06, vertices=8, ratios=[1.1], scale=(0.5, 1, 1))#手のひらの生成
palm_02_R=beditsub.adding_flesh_to_bone(armature, "palm.02.R", radius=0.06, vertices=8, ratios=[1.1], scale=(0.5, 1, 1))

thigh_L=beditsub.adding_flesh_to_bone(armature, "thigh.L", radius=0.08, vertices=8, ratios=[1.1, 0.9, 0.7])#大腿の生成
thigh_R=beditsub.adding_flesh_to_bone(armature, "thigh.R", radius=0.08, vertices=8, ratios=[1.1, 0.9, 0.7])

shin_L=beditsub.adding_flesh_to_bone(armature, "shin.L", radius=0.06, vertices=8, ratios=[1.1, 0.9, 0.7])#すねの生成
shin_R=beditsub.adding_flesh_to_bone(armature, "shin.R", radius=0.06, vertices=8, ratios=[1.1, 0.9, 0.7])

foot_L=beditsub.adding_flesh_to_bone(armature, "foot.L", radius=0.06, vertices=8, ratios=[1.1], scale=(1, 0.5, 1) )#足の生成
foot_R=beditsub.adding_flesh_to_bone(armature, "foot.R", radius=0.06, vertices=8, ratios=[1.1], scale=(1, 0.5, 1) )

# 結合処理--------------------------------------------------
bpy.ops.object.select_all(action='DESELECT')
obj_body.select_set(True)
obj_face.select_set(True)
palm_02_L.select_set(True)
forearm_L.select_set(True)
upper_arm_L.select_set(True)
palm_02_R.select_set(True)
forearm_R.select_set(True)
upper_arm_R.select_set(True)
foot_L.select_set(True)
shin_L.select_set(True)
thigh_L.select_set(True)
foot_R.select_set(True)
shin_R.select_set(True)
thigh_R.select_set(True)
bpy.context.view_layer.objects.active = obj_body
bpy.ops.object.join()# オブジェクトを結合する
obj=bpy.context.active_object # 直前でアクセスしたオブジェク
beditsub.set_basecolor(obj, materialname='マテリアル肌', rgb=(0.8, 0.47, 0.2, 1.0))
bpy.ops.object.shade_smooth() # スムースシェード指定
beditsub.set_shading_mode( 'MATERIAL' )# シェーディングモードを'MATERIAL'に設定
#beditsub.logfile.close()